Modules
The easiest way to include JO1N in your shop is using our modules, especially for non expert users.
Using our modules you can config how the module is going to be embedded in your site: Appearance and functioning.
To include the module, you only need to know which e-commerce is being using your side and choose it in the menu below.


WooCommerce
JO1N x WordPress installation guide for WooCommerce
- JO1N e-commerce lending module is used to connect online stores to the JO1N POS lending service. Used as the standard payment method for financing the goods (paying for an order).
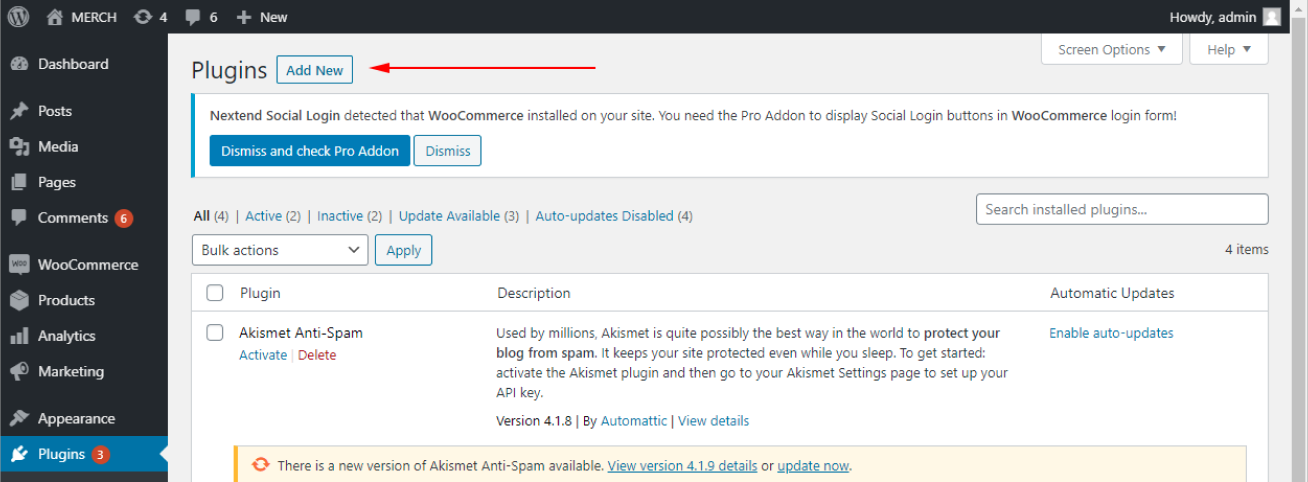
- 1. Proceed to the “Plugin” section of your menu and select it:
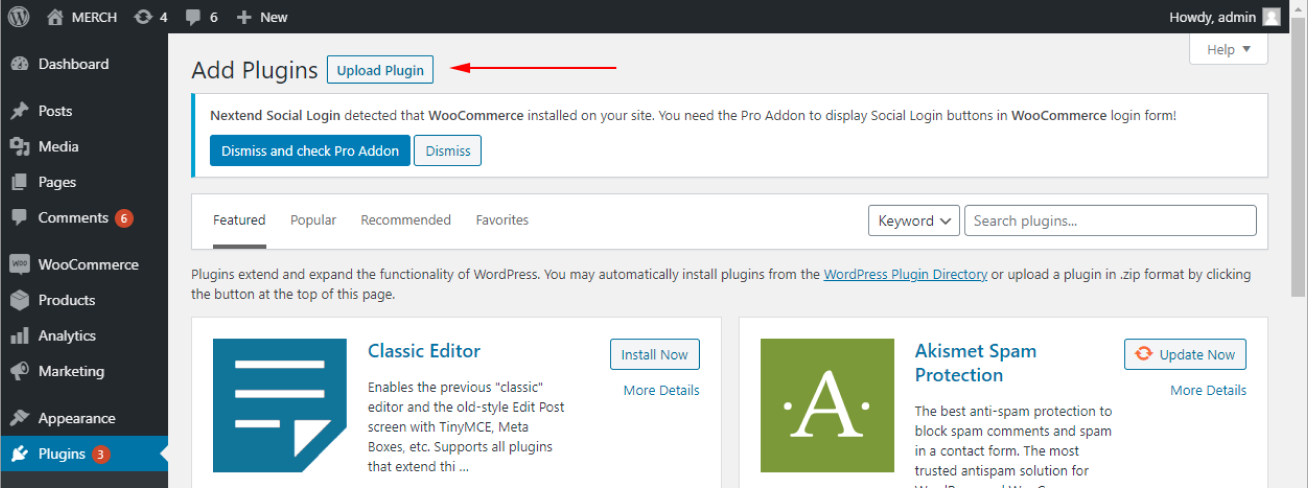
- 2. Choose “Add New”:
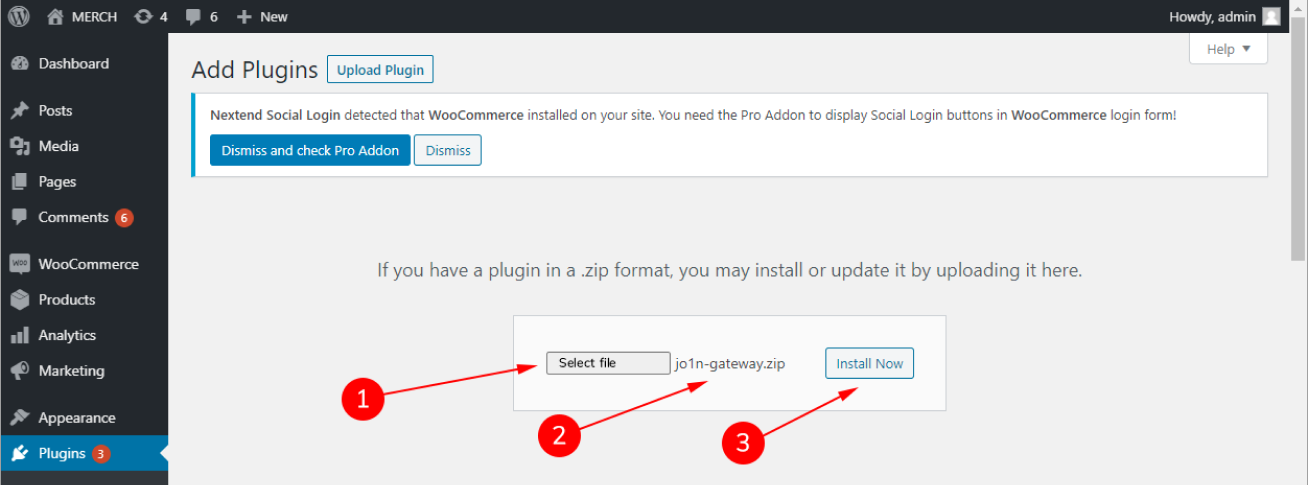
- 3. Press the “Upload Plugin” option:
- 4. (1) Upload the downloaded module and (2) press “Install Now” button:
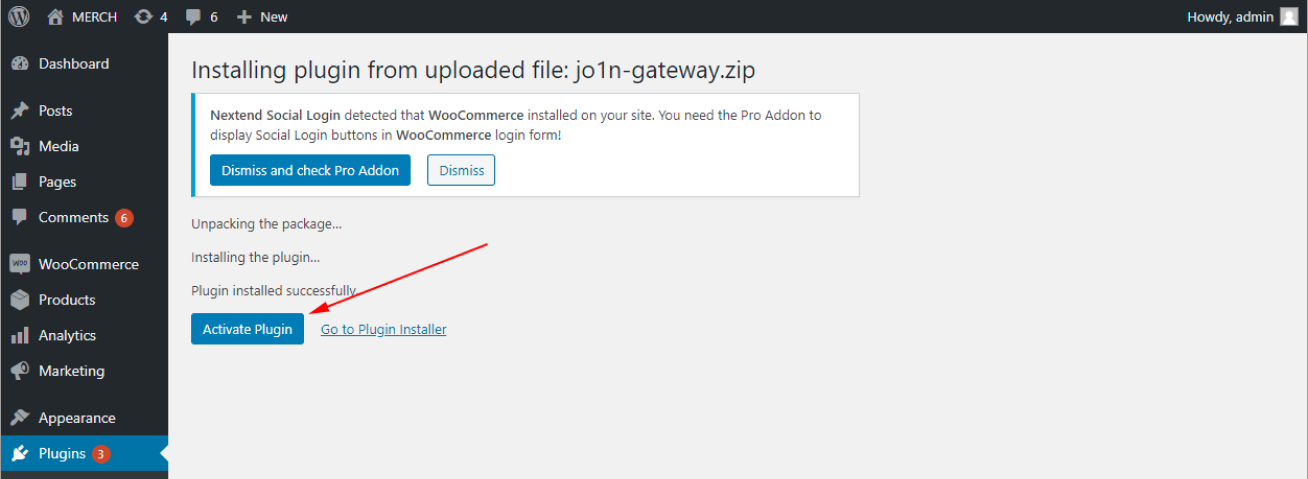
- 5. Authorise the plugin:
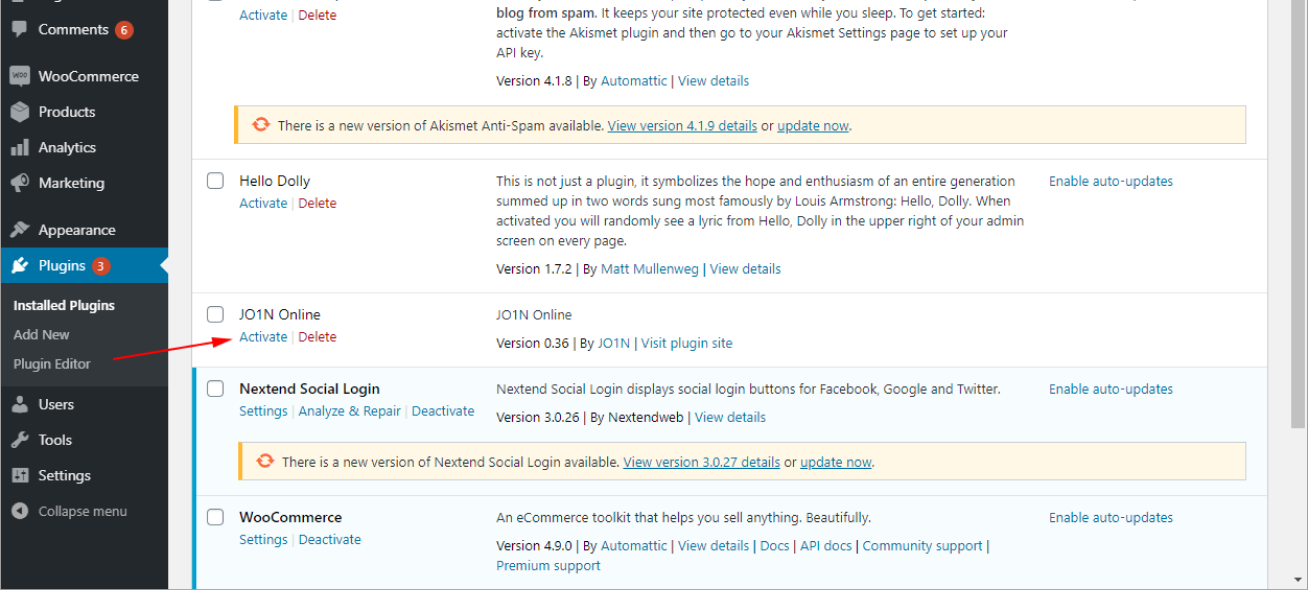
- 6. You can activate the plugin also from the “Plugins” section your left menu:
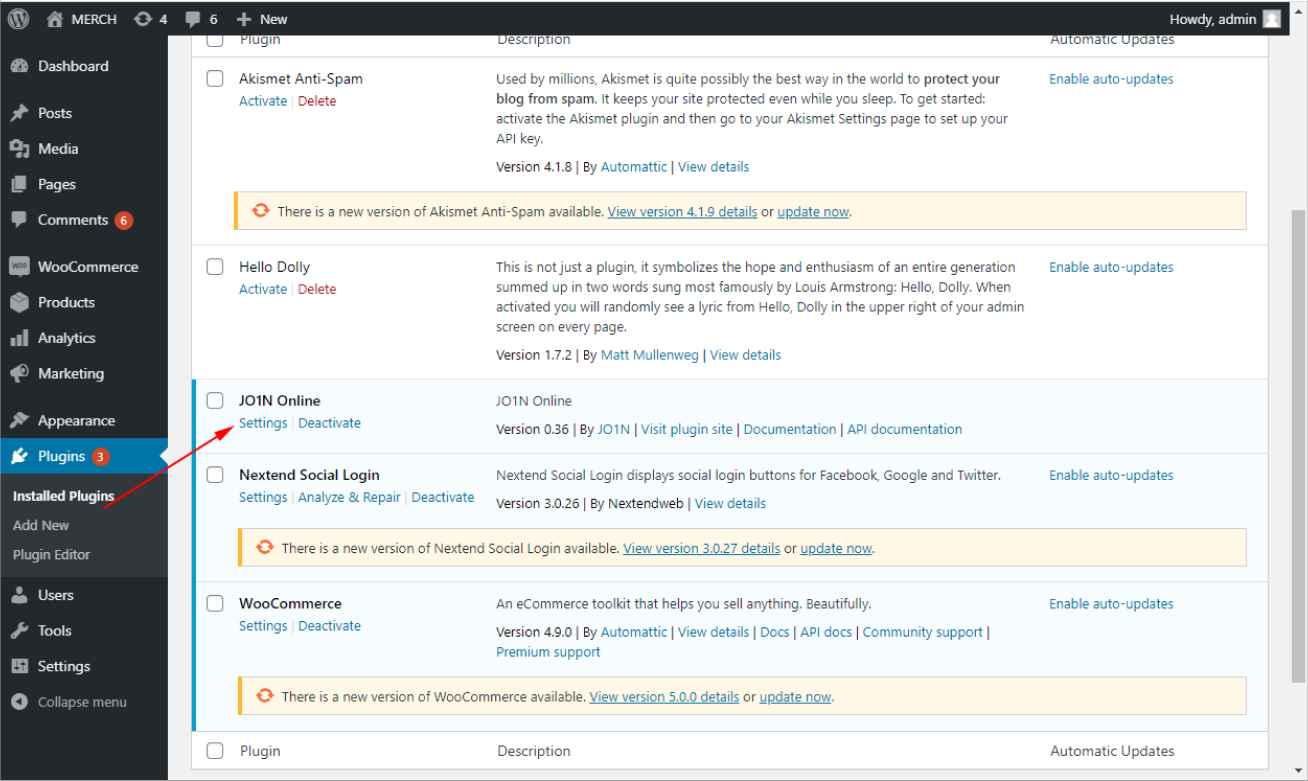
- 7. After the successful plug activation, procees to its “Settings”
- 8. On the settings page of the JO1N payment module, you must fill in the settings previously agreed with your manager:
(1) Title – order payment method name at the checkout page
(2) Description - an explanatory description that will be displayed as a comment to the payment method on the checkout page
(3) HOST API JO1N – lending service address, test service address is set by default.
(4) processCode - ???
(5) Login – login of the demo store. After the testing and installation of the functional solution has to be changed for the login of your merchant store.
(6) Password – Test account password is 1234567, After the testing and installation of the functional solution has to be changed for the password of your merchant store.
(7) Sales outlet code – the code of the merchant that will be sent to the JO1N servers by default along with the order.
(8) Product category code – product group code 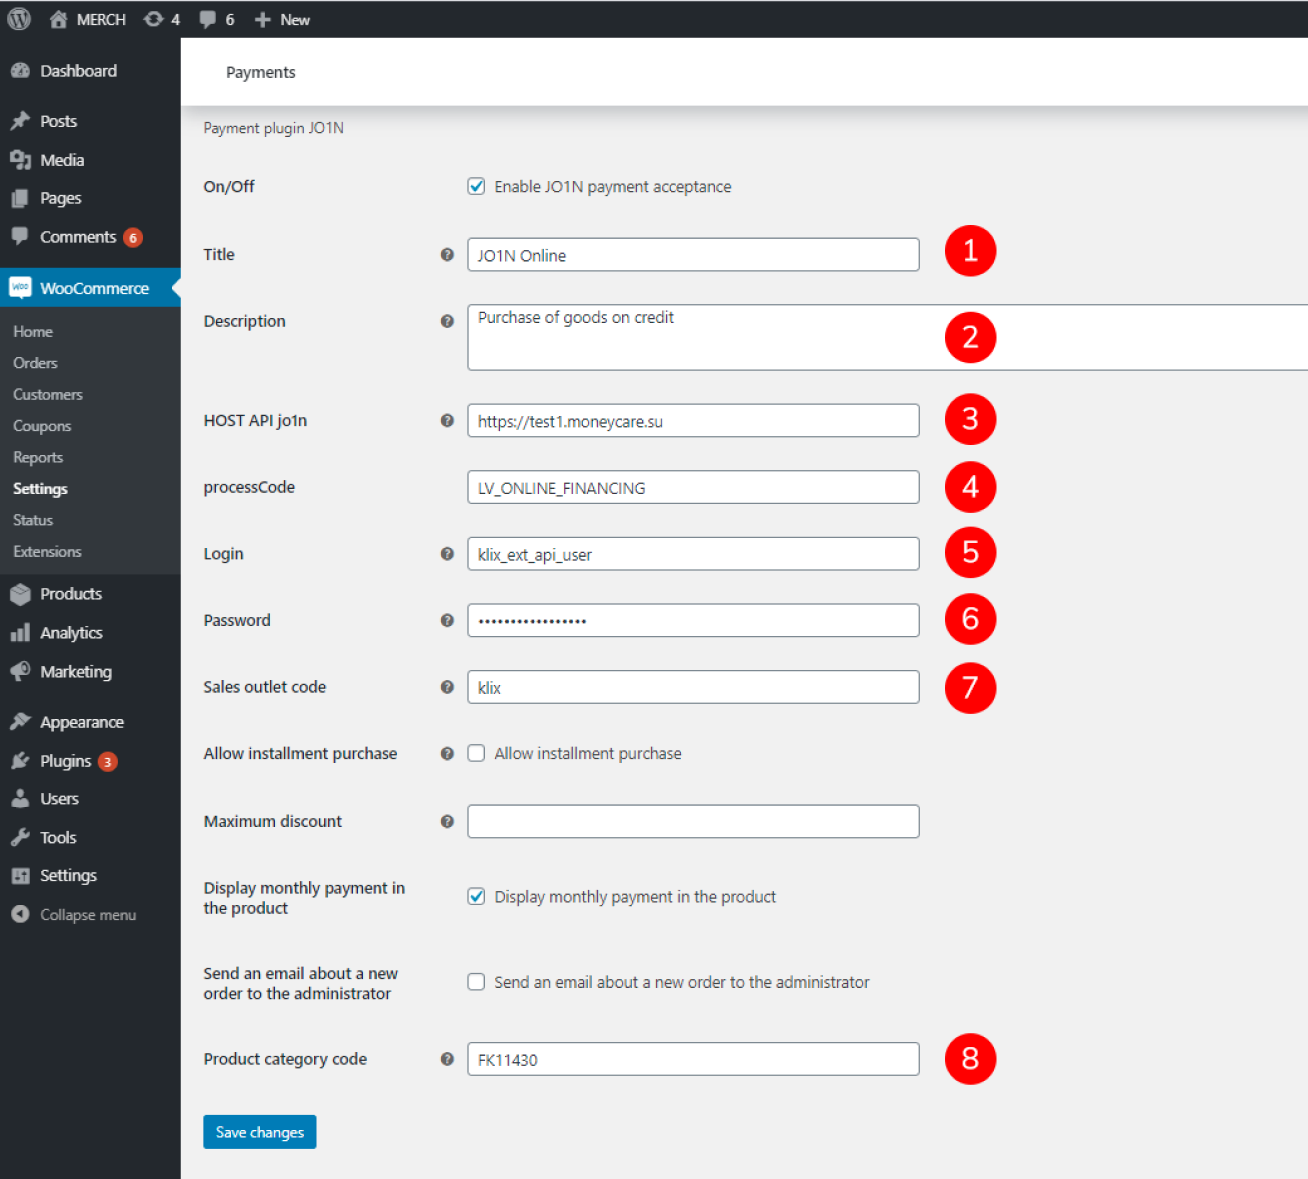
- JO1N x WordPress installation guide for WooCommerce
- 1. On the settings page of the JO1N payment module, you must fill in the settings previously agreed with your manager:
(1) Title – order payment method name at the checkout page
(2) Description - an explanatory description that will be displayed as a comment to the payment method on the checkout page
(3) HOST API JO1N – lending service address, test service address is set by default.
(4) processCode - ???
(5) Login – login of the demo store. After the testing and installation of the functional solution has to be changed for the login of your merchant store.
(6) Password – Test account password is 1234567, After the testing and installation of the functional solution has to be changed for the password of your merchant store.
(7) Sales outlet code – the code of the merchant that will be sent to the JO1N servers by default along with the order.
(8) Product category code – product group code
 Module download
Magento 2
JO1N x Magento 2.x installation guide:
- The JO1N_Gateway lending module is used to connect online stores to the JO1N POS lending solution. Used as the standard payment method for financing the goods on your website.
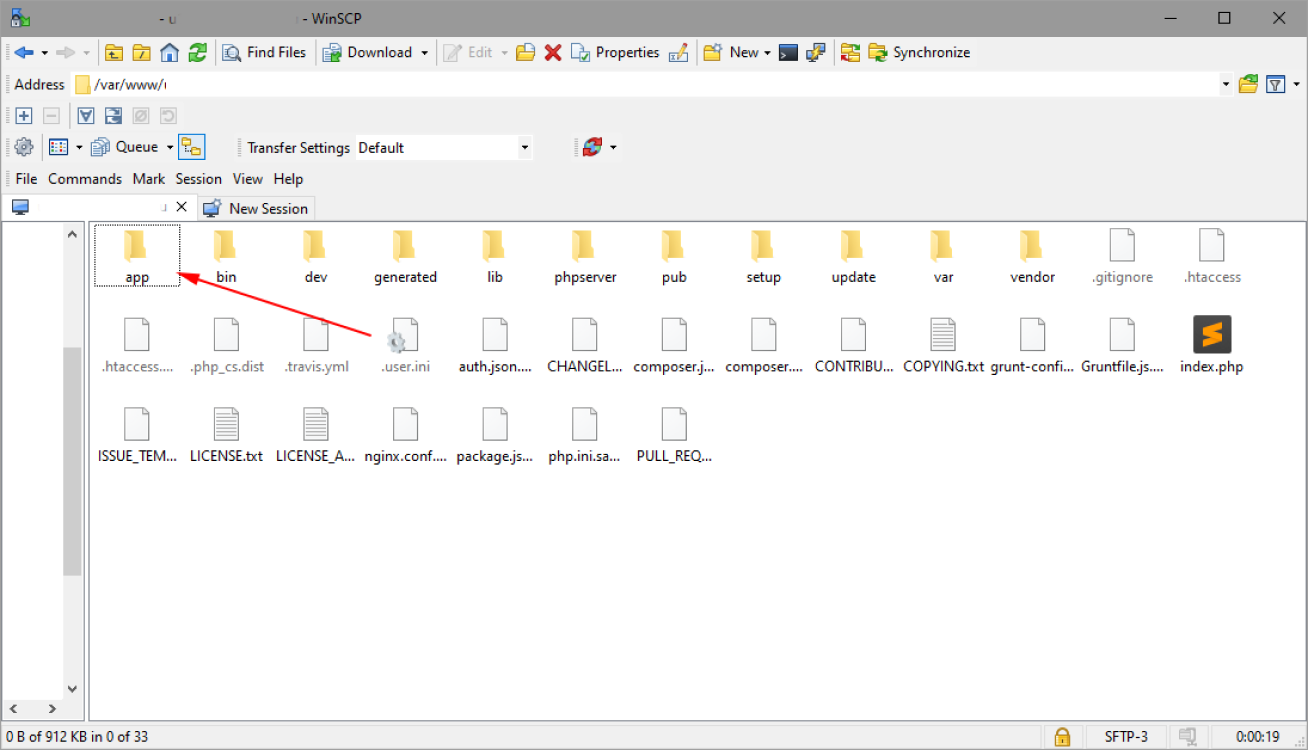
- 1. Open any FTP client and navigate to your domain folder. Search for a folder named “app” and navigate to it:
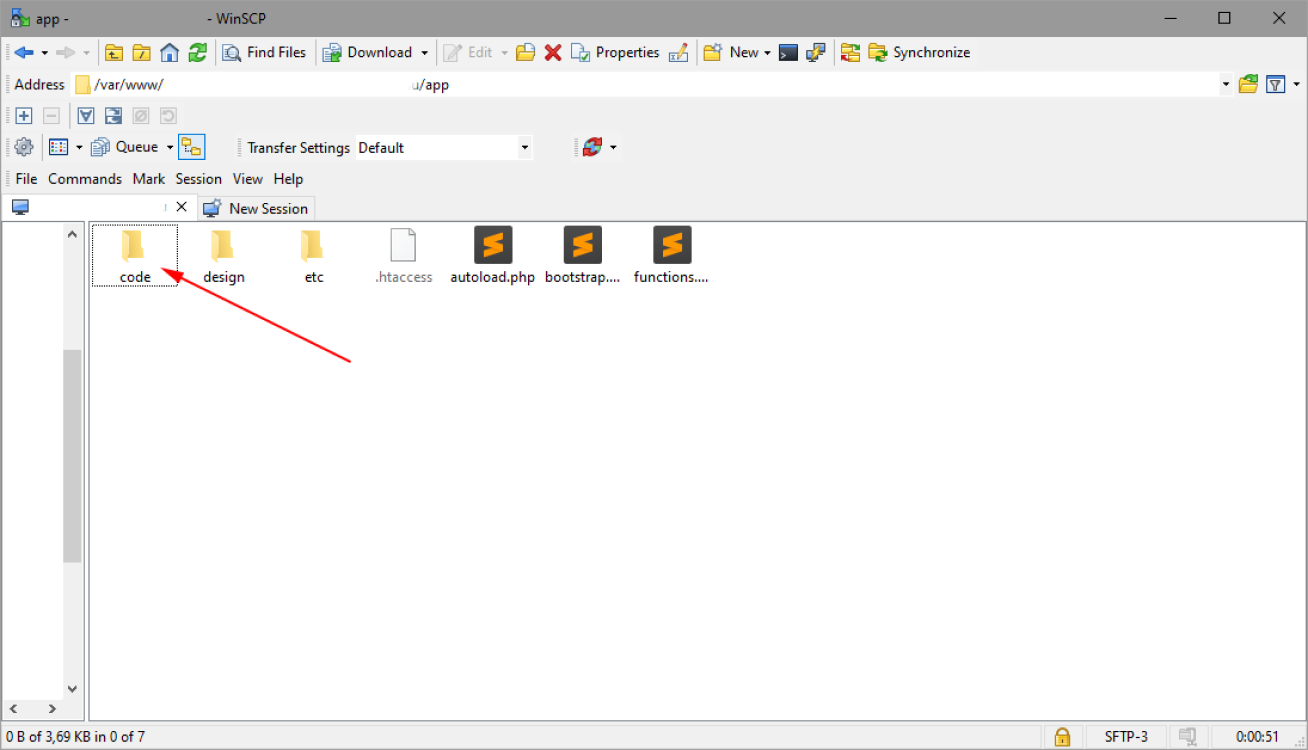
- 2. Find the “code” folder in the “app folders. If “code” folder is missing, create one and navigate to the newly created folder:
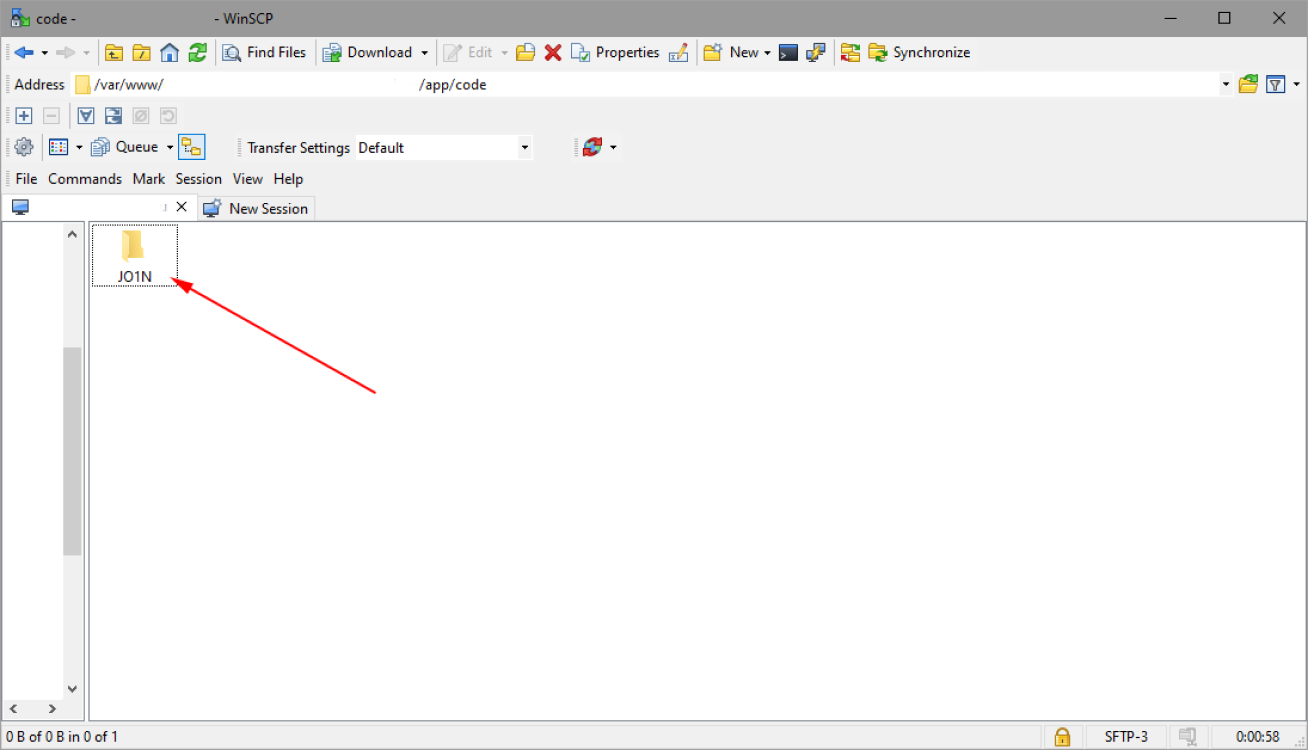
- 3. Upload JO1N folder with the module to the “code” folder:
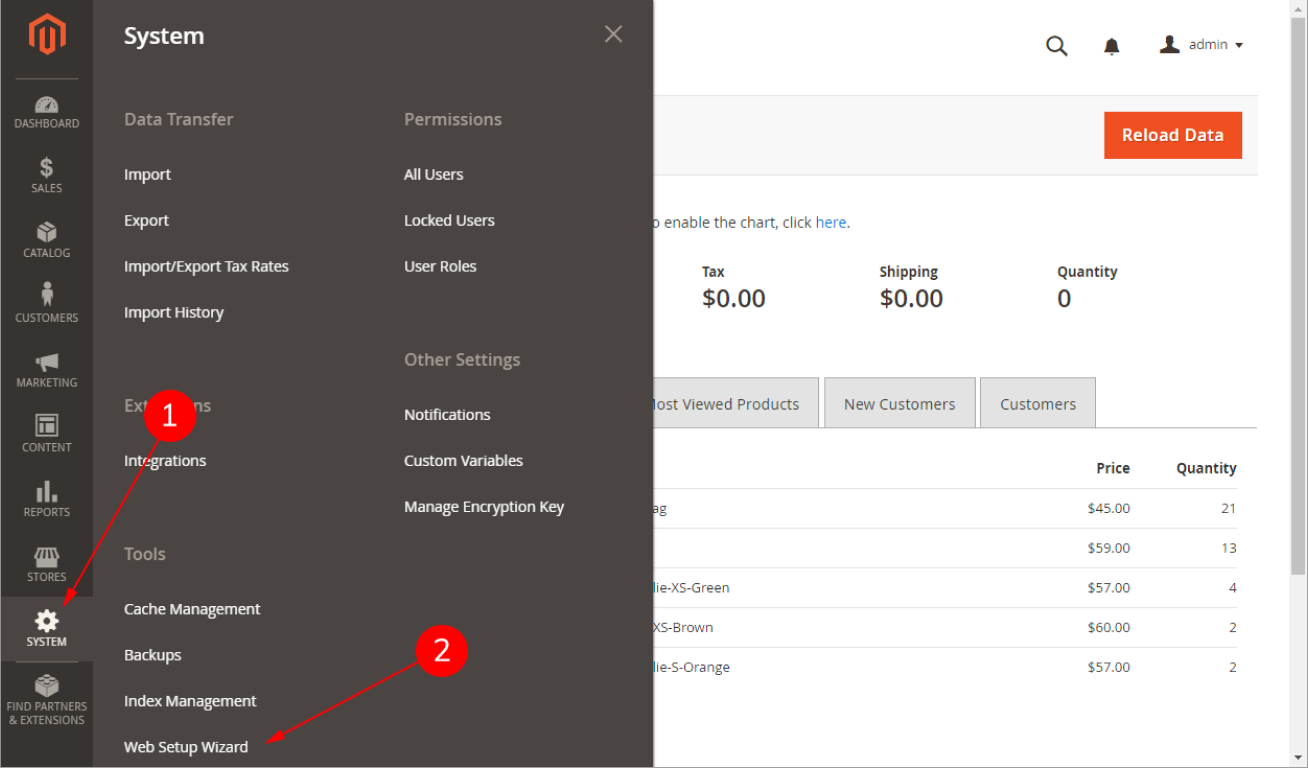
- 4. After the successful JOIN module upload, go to your Magento 2.X control panel: (1) Select “System” in the left menu of the control panel (2) Click on the “Web Setup Wizard” menu button
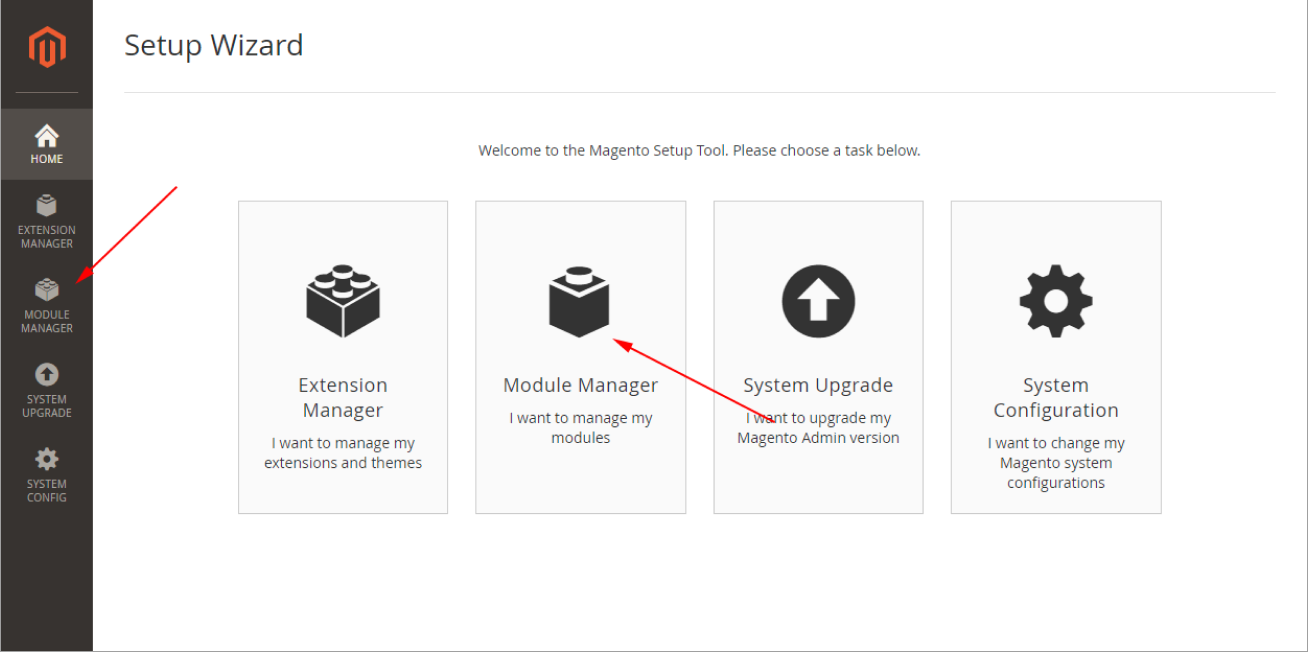
- 5. Proceed to the “Setup Wizard” - click on the “Module Manager”:
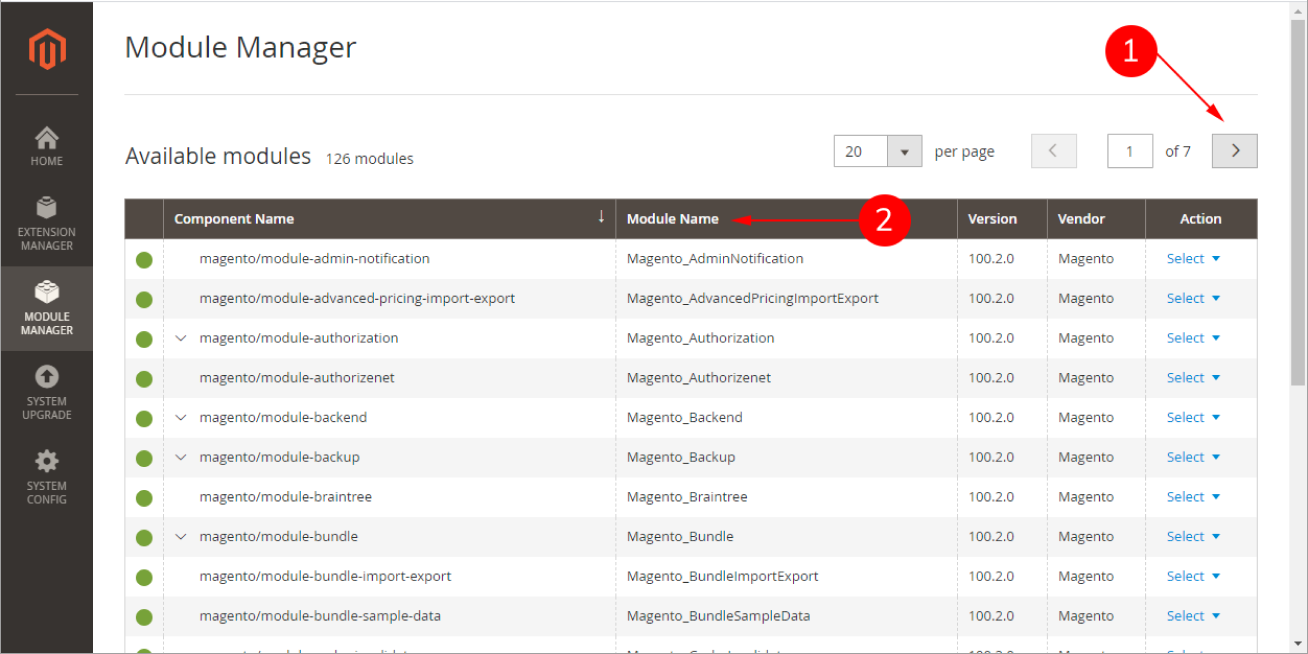
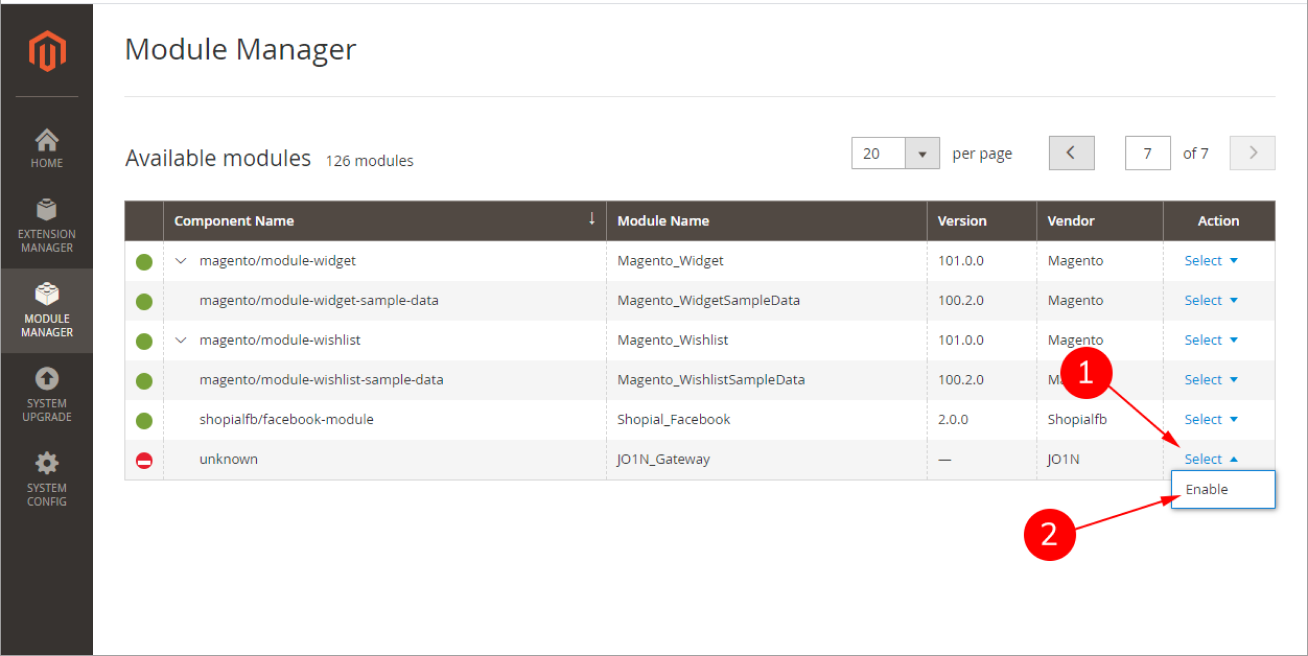
- 6. In the Module Manager, using the page pressing the page navigation button (1) – find the loaded module in the column (2) “Module Name” – “JO1N_Gateway”:
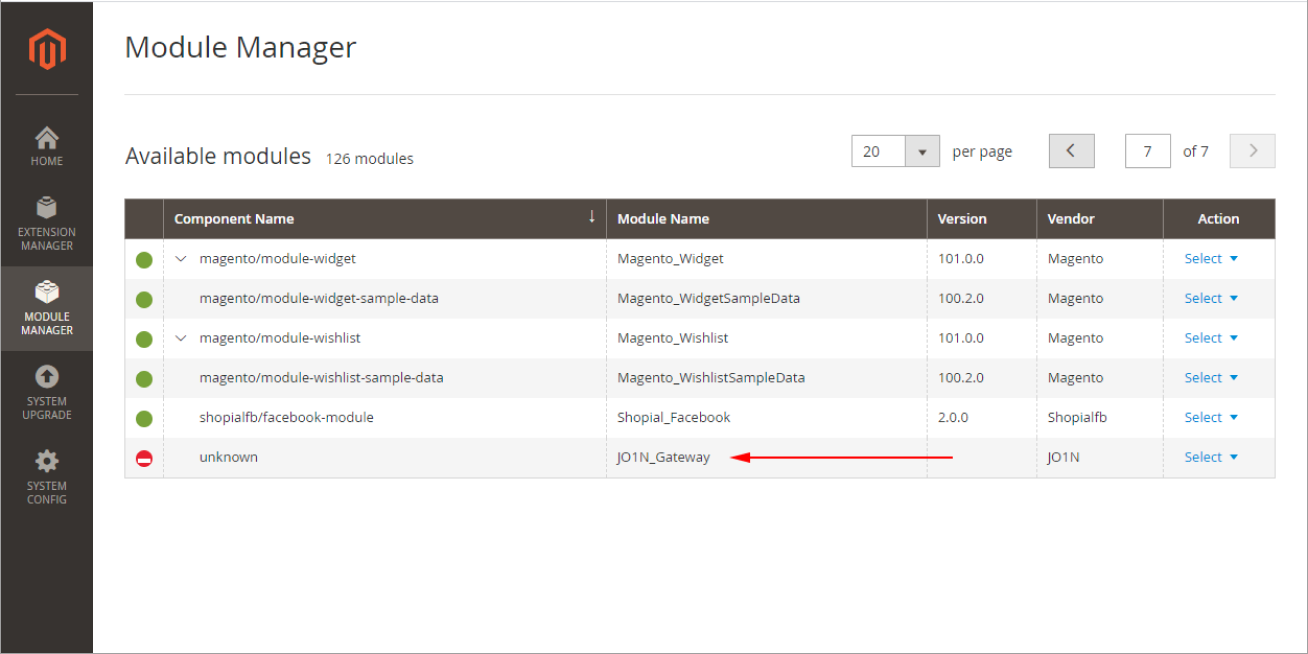
- 7. Once previous step completed, click the (1) “Select” and (2) set it as “Enabled”:
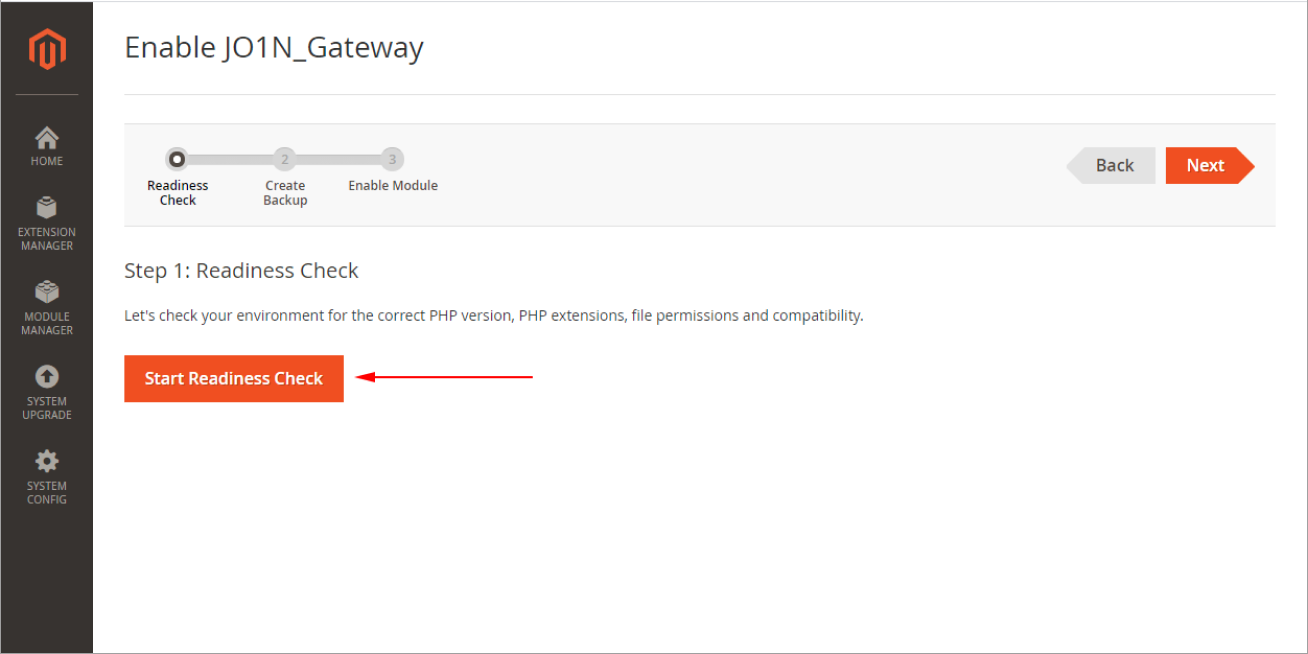
- 8. Click on the “Start Readiness Check” button in the new module enabling window:
- 9. click the “Next” button after succeeding at the previously mentioned window:

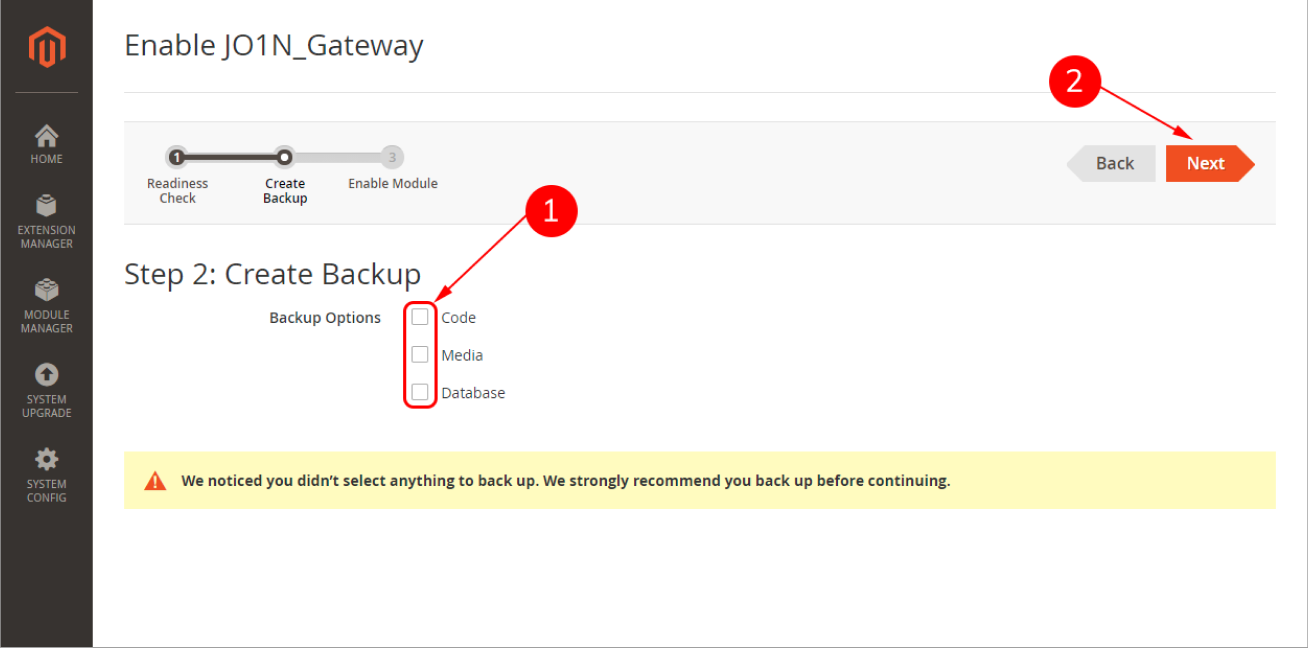
- 10. (1) Untick the selected boxes and (2) proceed by pressing “Next”:
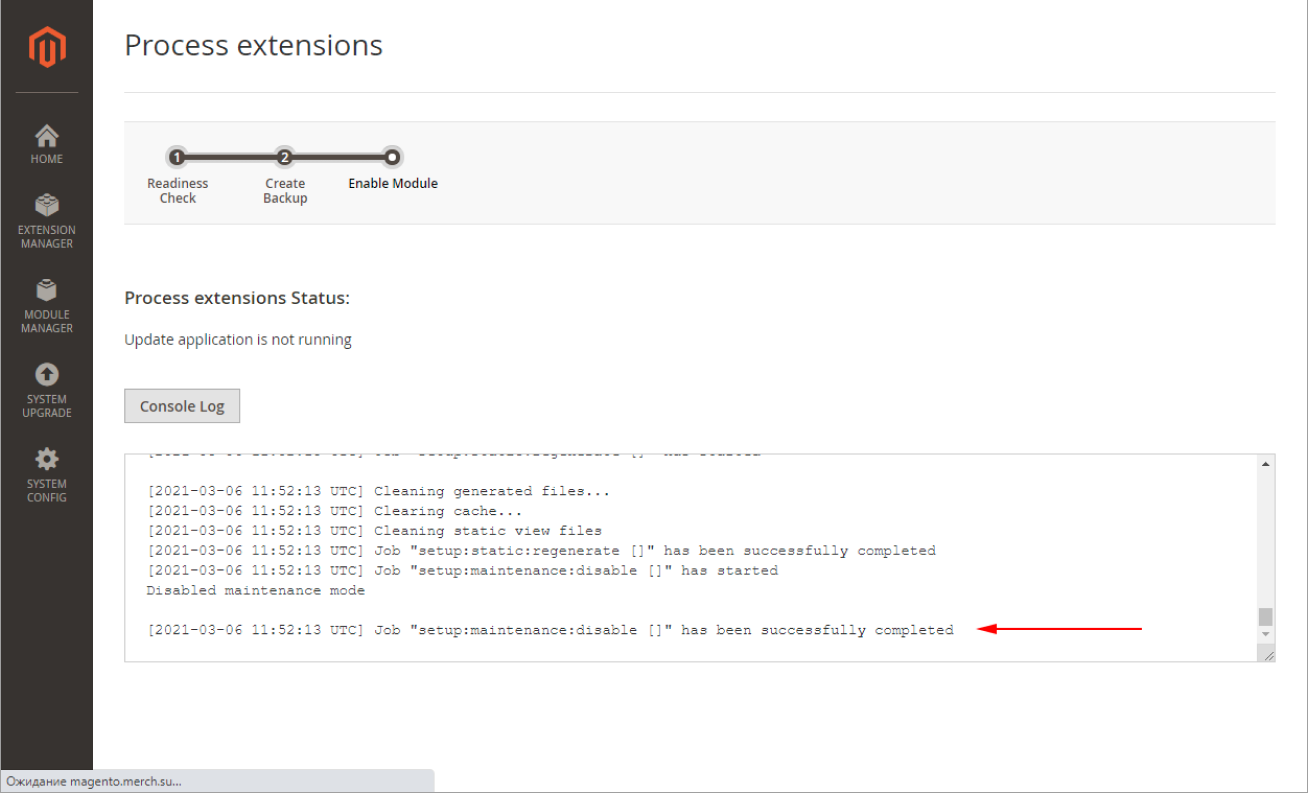
- 11. Then, click the “Enable” button:
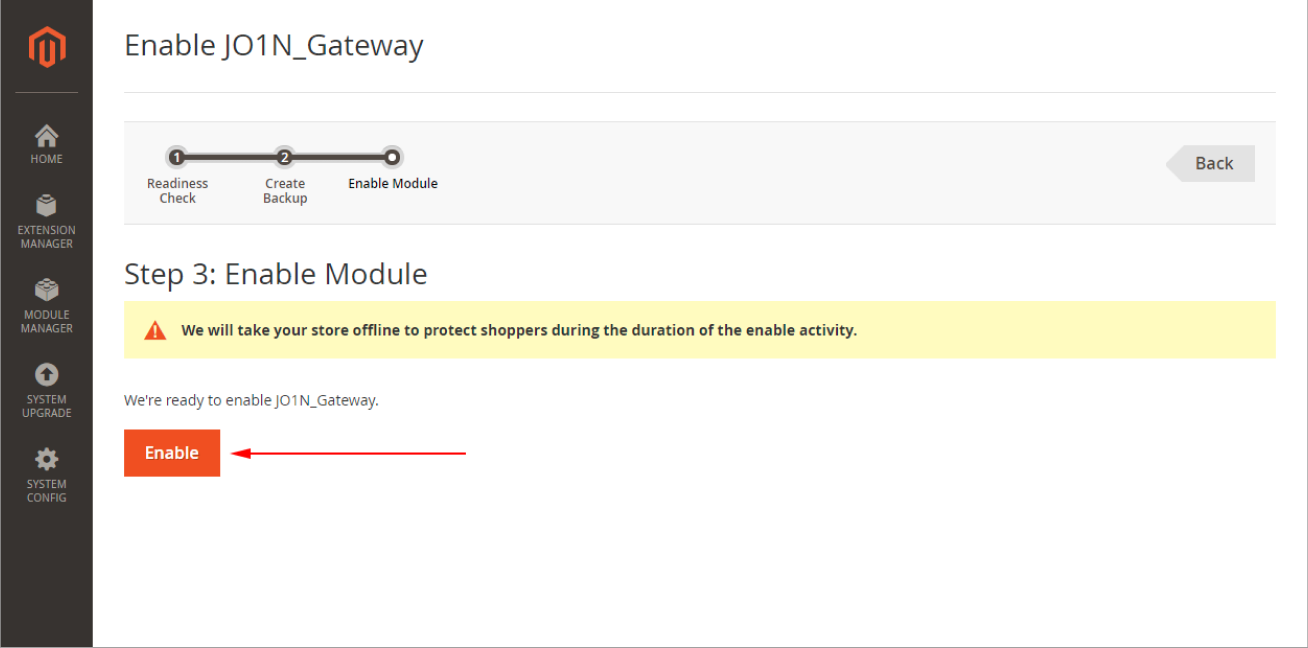
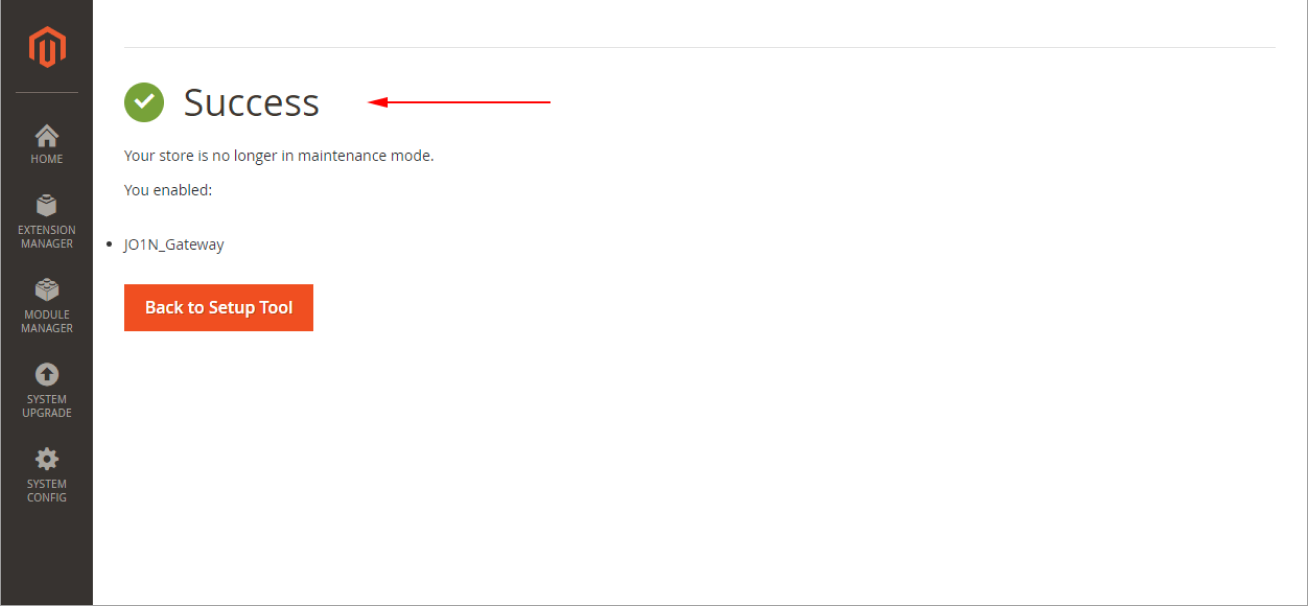
- 12. Await for the successful completion of the module activation process:
- JO1N x Magento 2.x set-up guide:
- 1. Proceed to your Magento 2.X dashboard
(1) Select “Stores” in the left menu of the control panel
(2) Next, click on the item “Configuration” 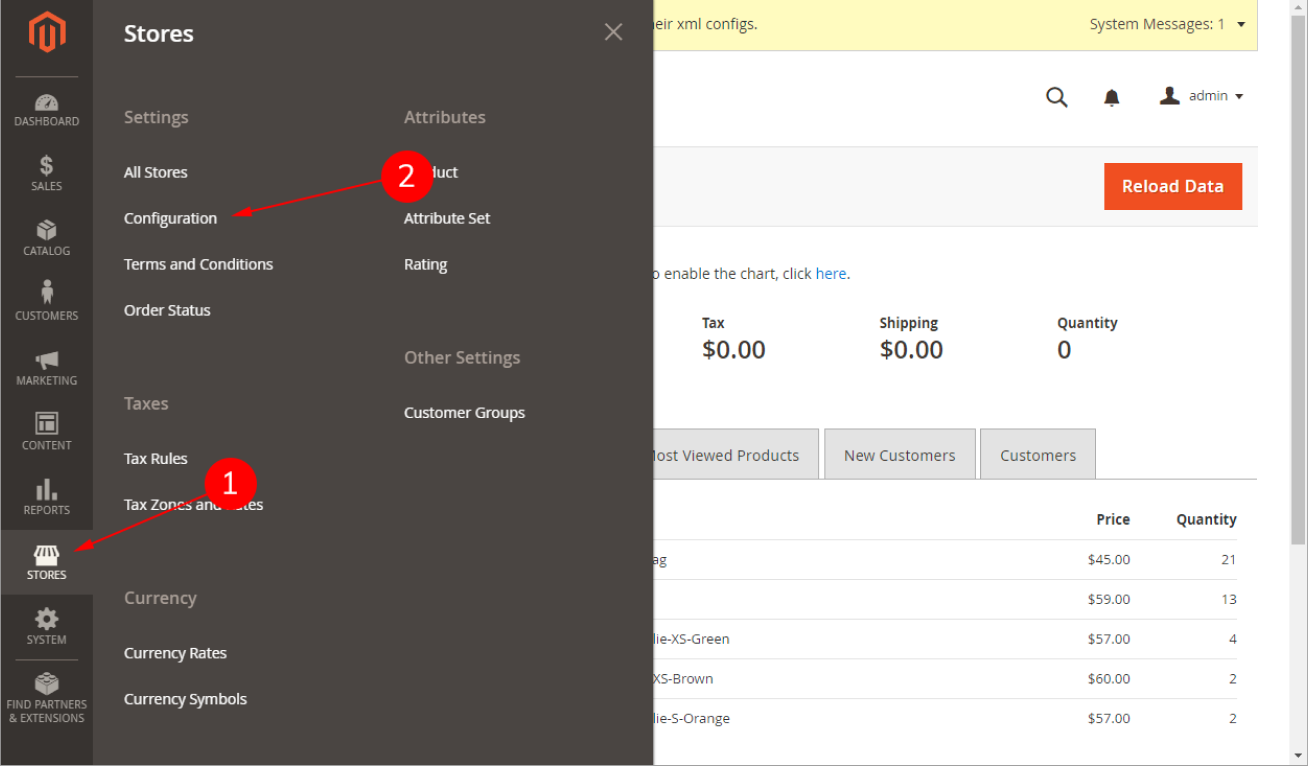
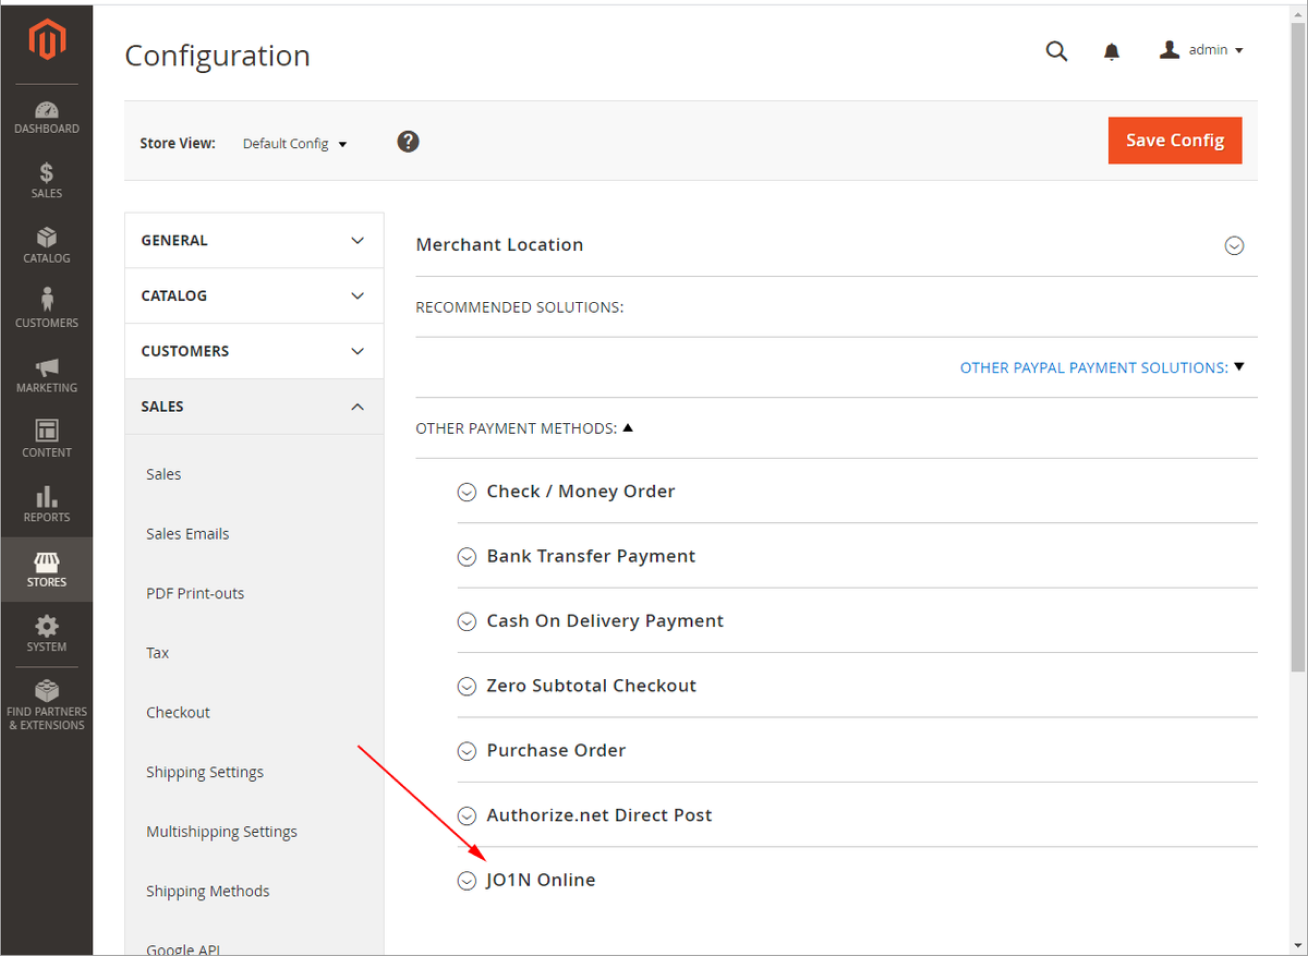
- 2. (1) Find the “Sales” item in the Configuration window, and click on it. (2) Find the “Payment Methods” item in the menu that opens
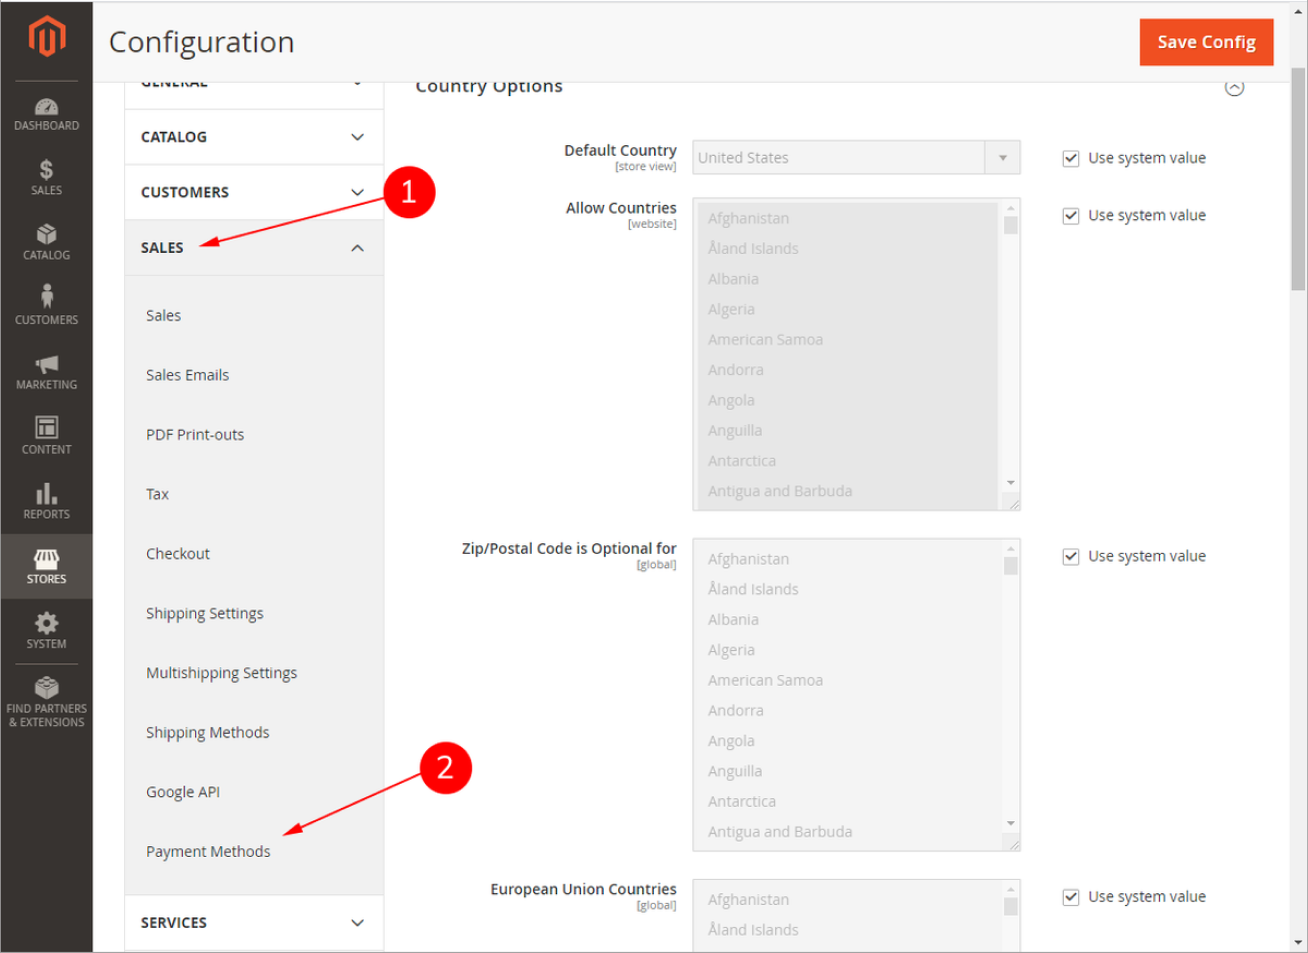
- 3. Find the installed JO1N Online module in the “Payment Methods” window and click on it
- 4. Now, fill in the settings agreed with your line manager, alternatively yourself, on the setting page.
(1) Enabled – enables the payment module
(2) Title – the name of the payment method on the checkout page
(3) Api Url – lending service address; the test service address is set by default
(4) Login – login to connect to the lending service
(5) groupId – product group agreed with your manager
(6) processCode – ???
(7) Api Key (password) – password for connecting to the lending service
(8) pointId – trade point code
Click on the “Save Config” button After entering the data (9) 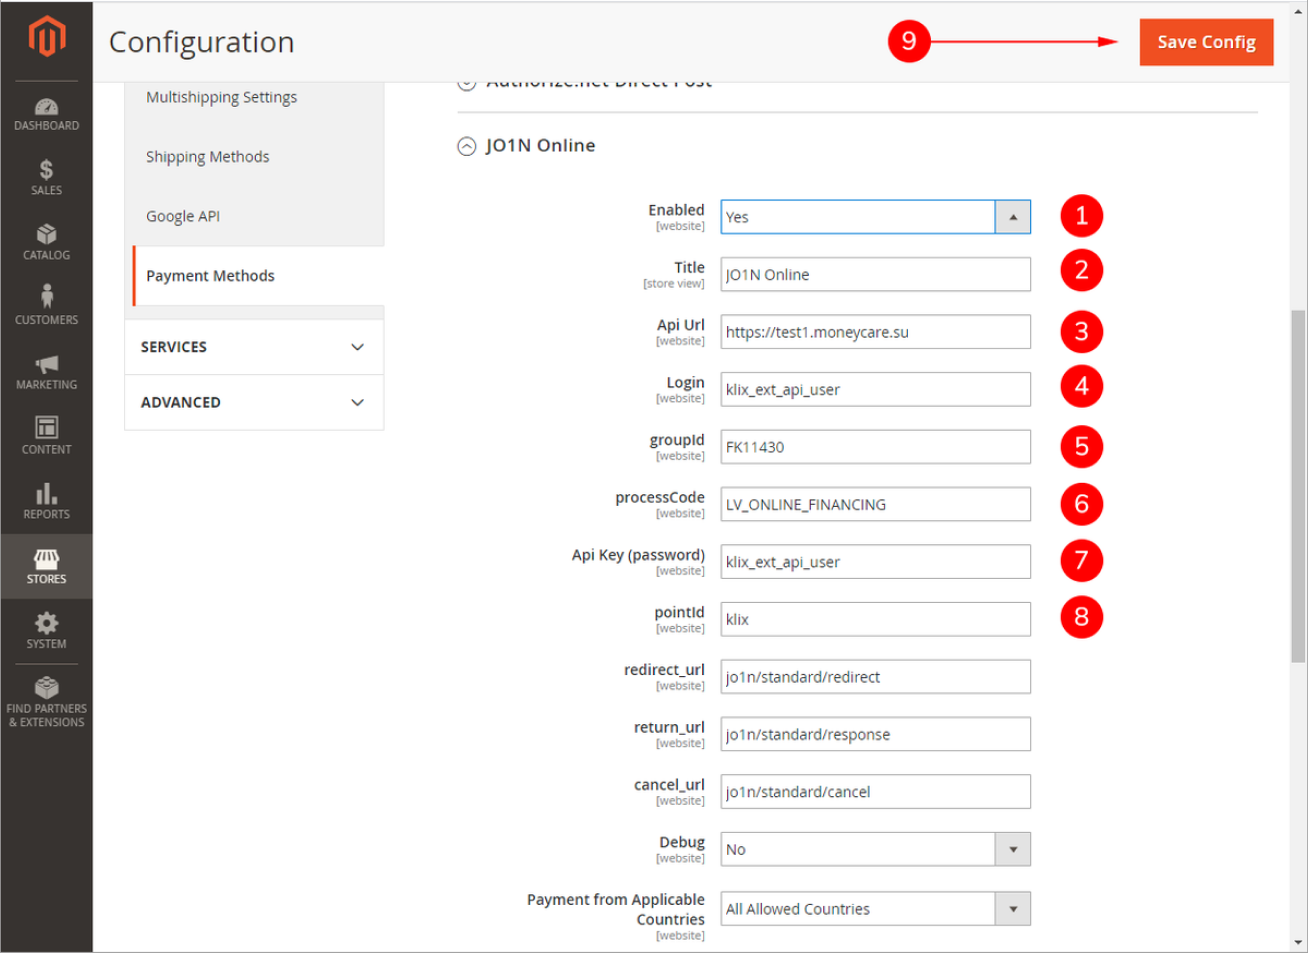
Prestashop
JO1N x Prestashop installation guide
- JO1N e-commerce lending module is used to connect online stores to the JO1N POS lending service. Used as the standard payment method for financing the goods (paying for an order).
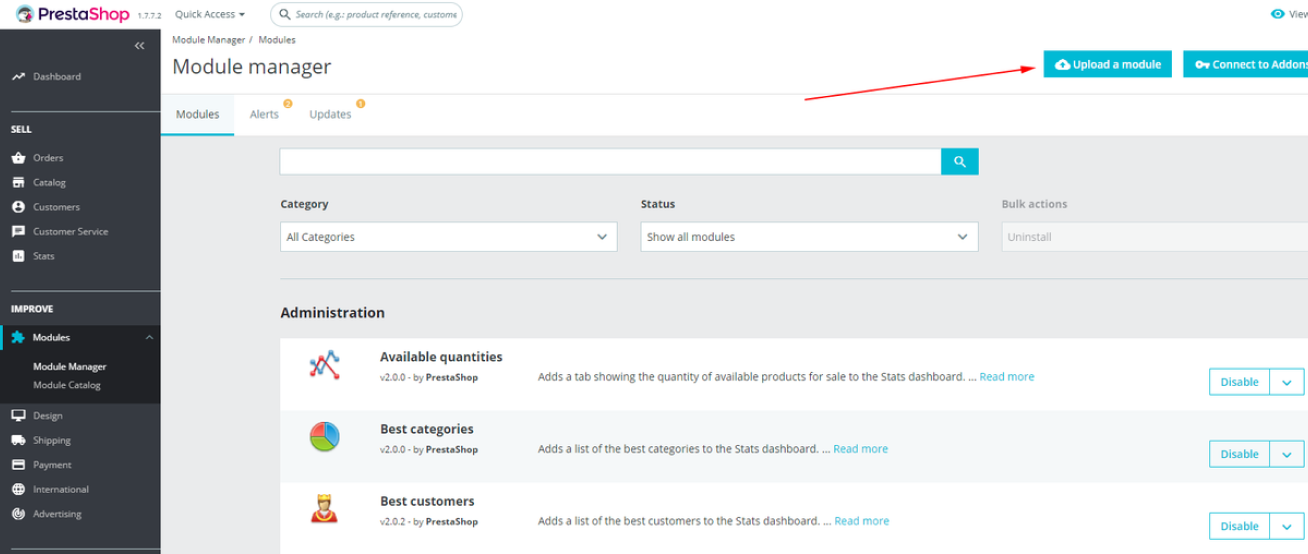
- 1. Procees to the “Plugins” section in your left menu and click on it:
- 2. Press the “Upload module” button
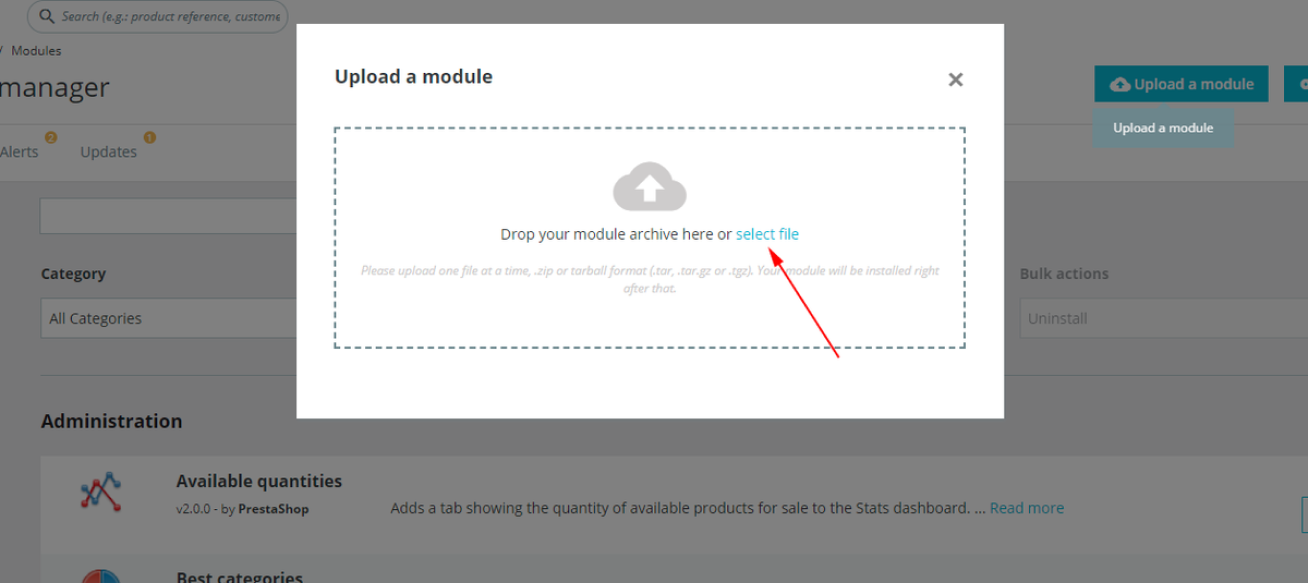
- 3. Upload the recently downloaded module to the pop-up window
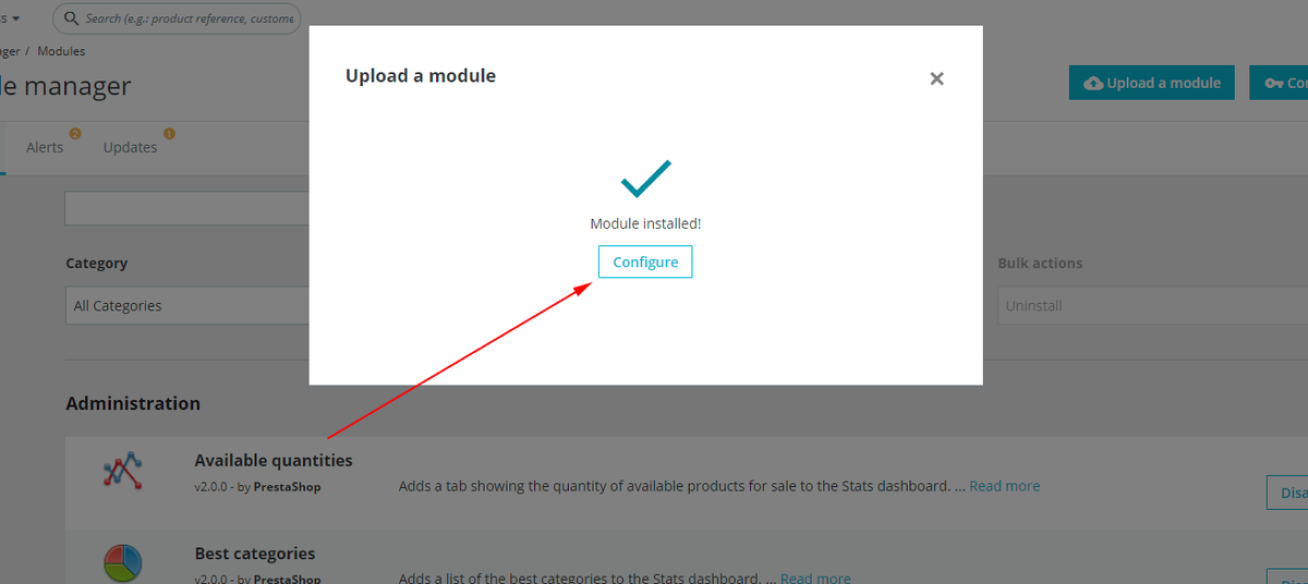
- 4. Await for the successful installation of the module
- 6. Now, fill in the settings agreed with your line manager, alternatively yourself, on the setting page:
(1) Api Url – lending service address; the test service address is set by default.
(2) Login – login of the demo store. After the testing and installation of the functional solution has to be changed for the login of your merchant store.
(3) Password – Test account password is 1234567, After the testing and installation of the functional solution has to be changed for the password of your merchant store
(4) Point ID – merchant retail store code, which will be passed to JO1N by default together with the order details.
(5) Group ID – item group code
(6) processCode - ???
(7) Status after success payment – order status after the successful loan application 
- JO1N x Prestashop set-up guide:
- 1. Now, fill in the settings agreed with your line manager, alternatively yourself, on the setting page:
(1) Api Url – lending service address; the test service address is set by default.
(2) Login – login of the demo store. After the testing and installation of the functional solution has to be changed for the login of your merchant store.
(3) Password – Test account password is 1234567, After the testing and installation of the functional solution has to be changed for the password of your merchant store
(4) Point ID – merchant retail store code, which will be passed to JO1N by default together with the order details.
(5) Group ID – item group code
(6) processCode - ???
(7) Status after success payment – order status after the successful loan application 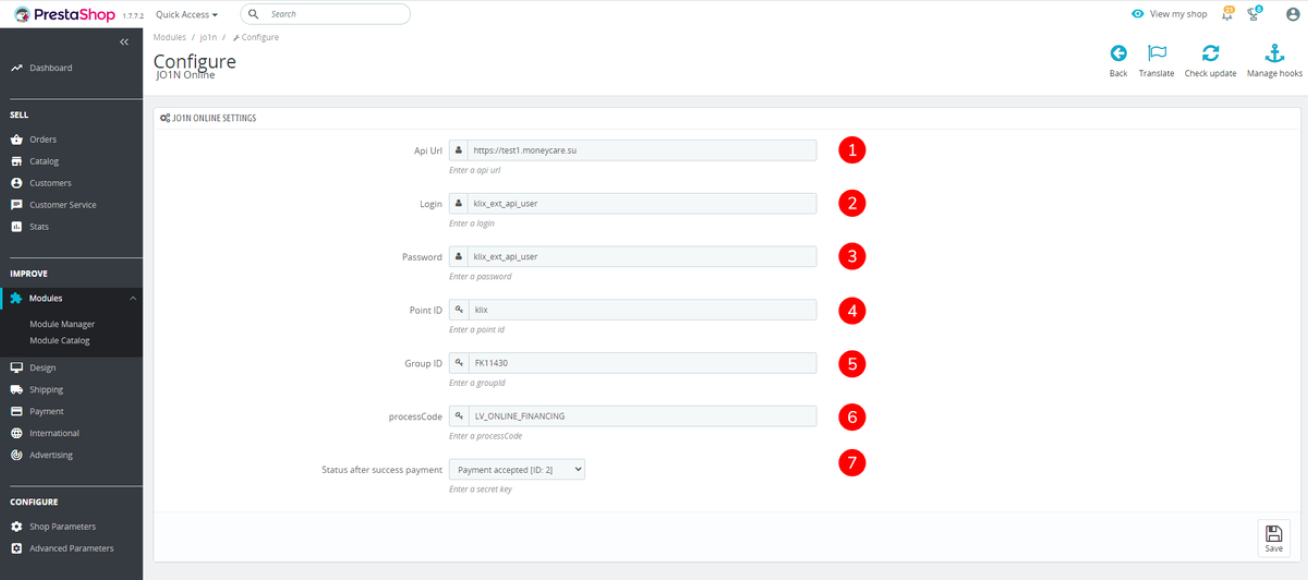
OpenCart
JO1N e-commerce lending module is used to connect online stores to the JO1N POS lending service. Used as the standard payment method for financing the goods (paying for an order).
- JO1N x OpenCart 2.1 installation guide:
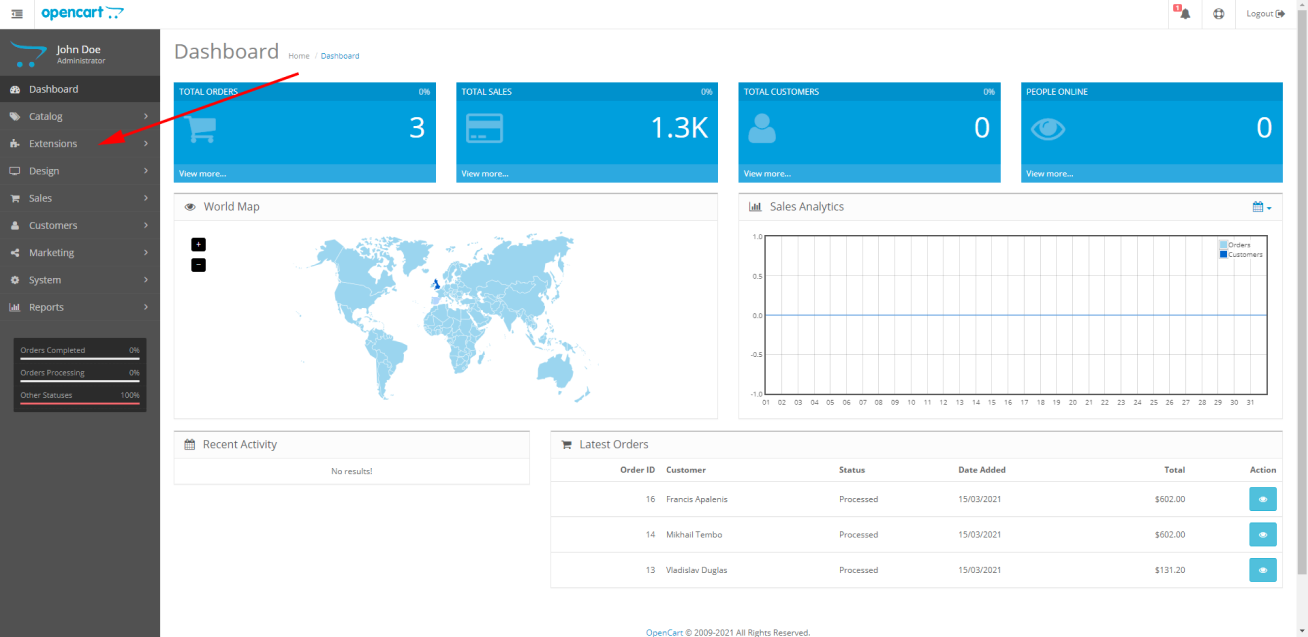
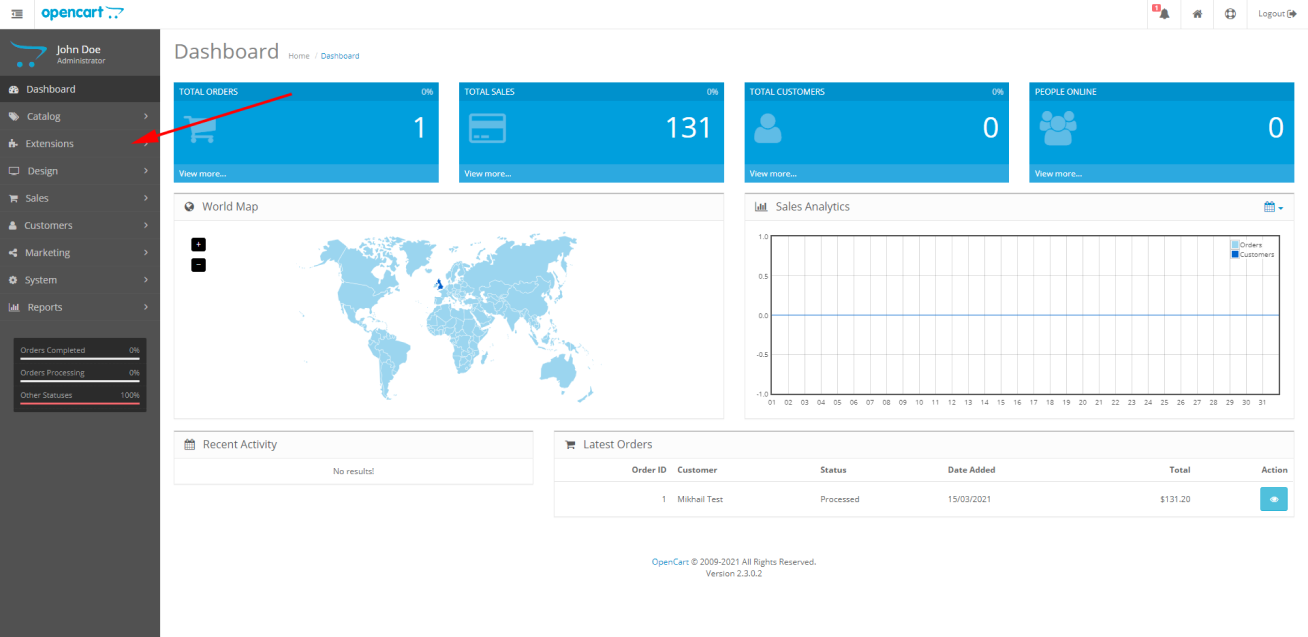
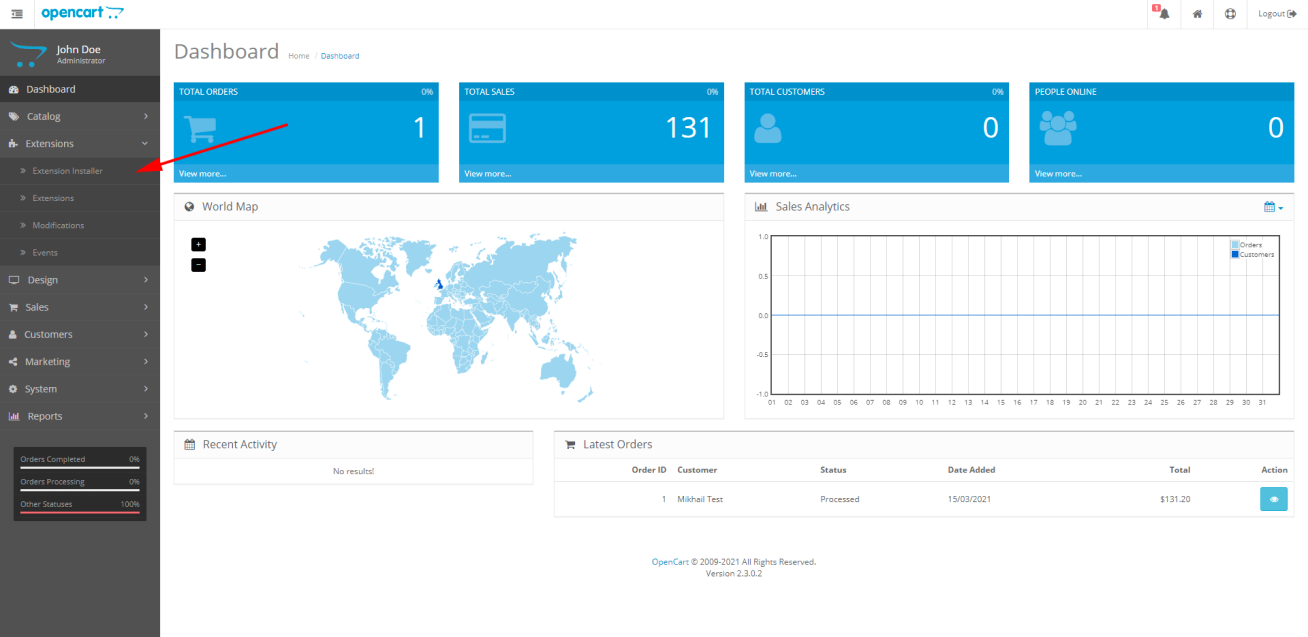
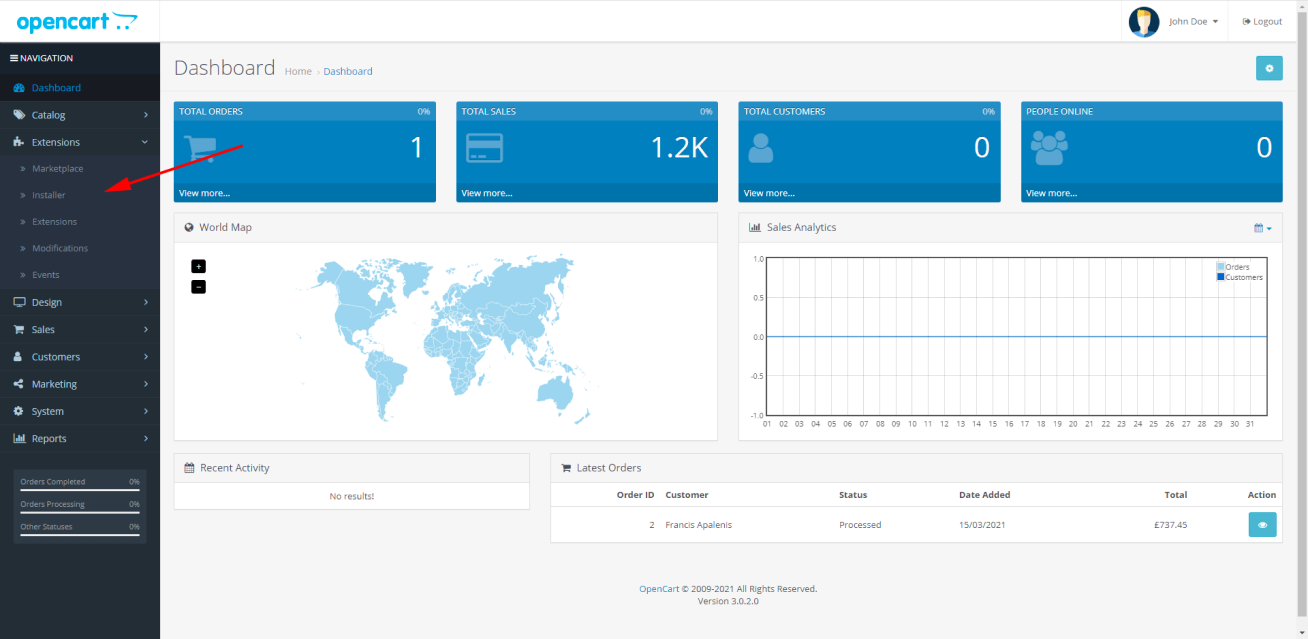
- 1. Click on the "Extensions" section (displayed by the red arrow) In the control panel:
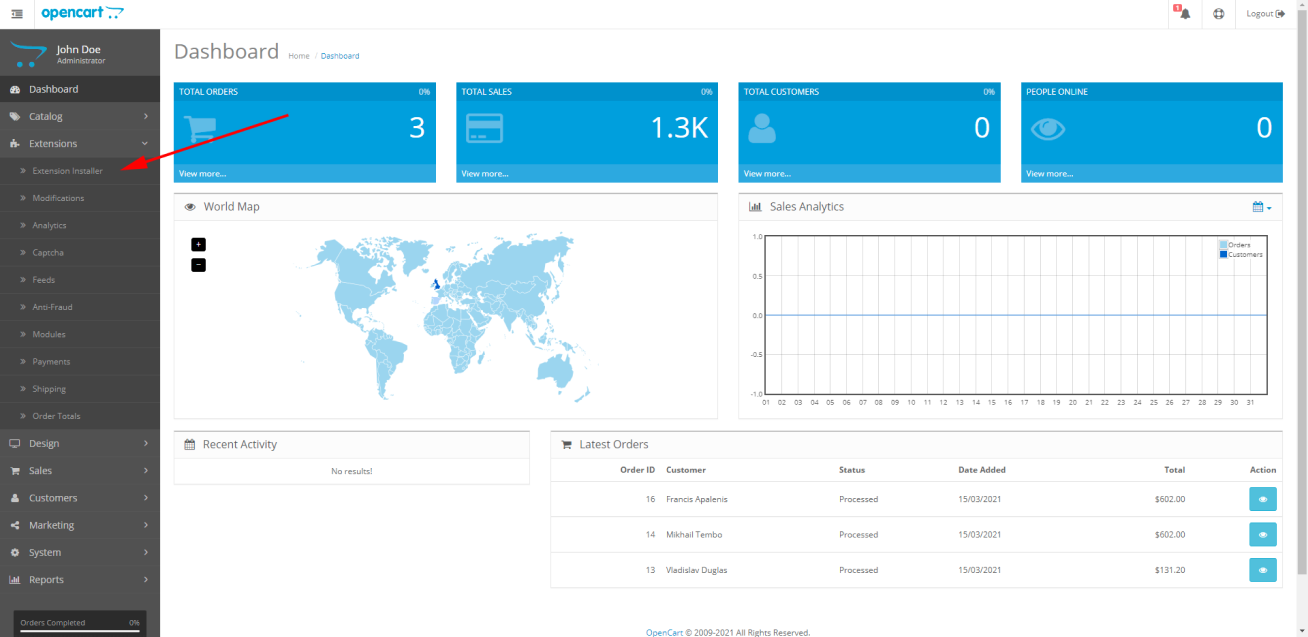
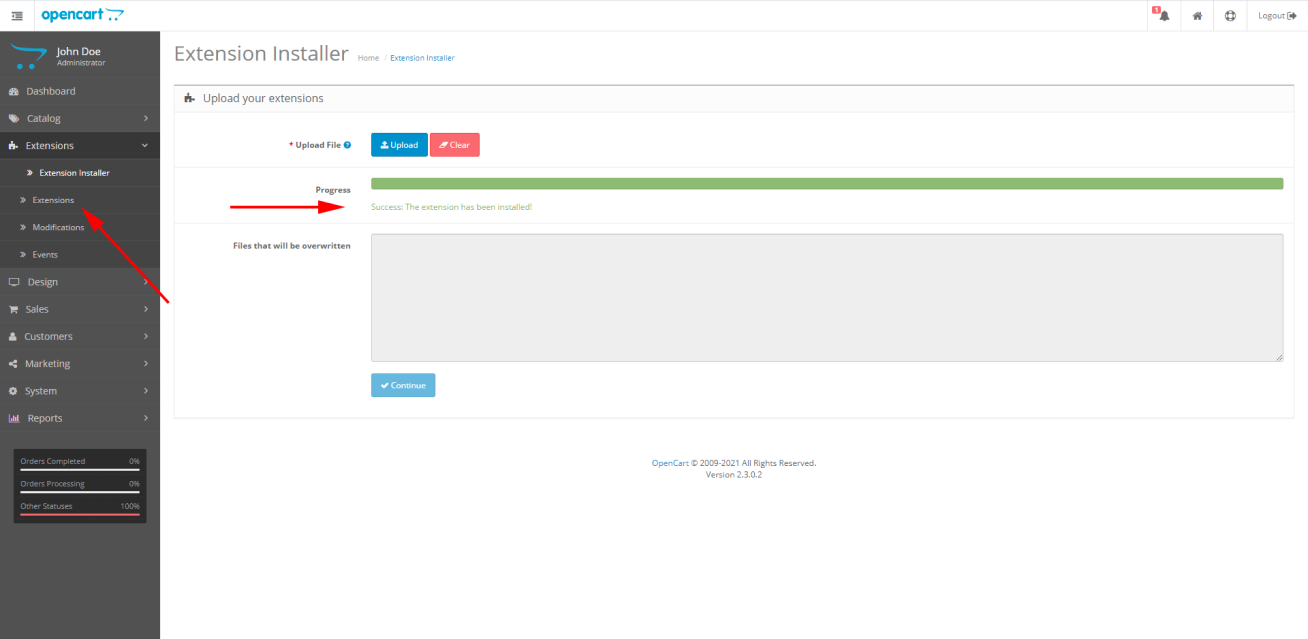
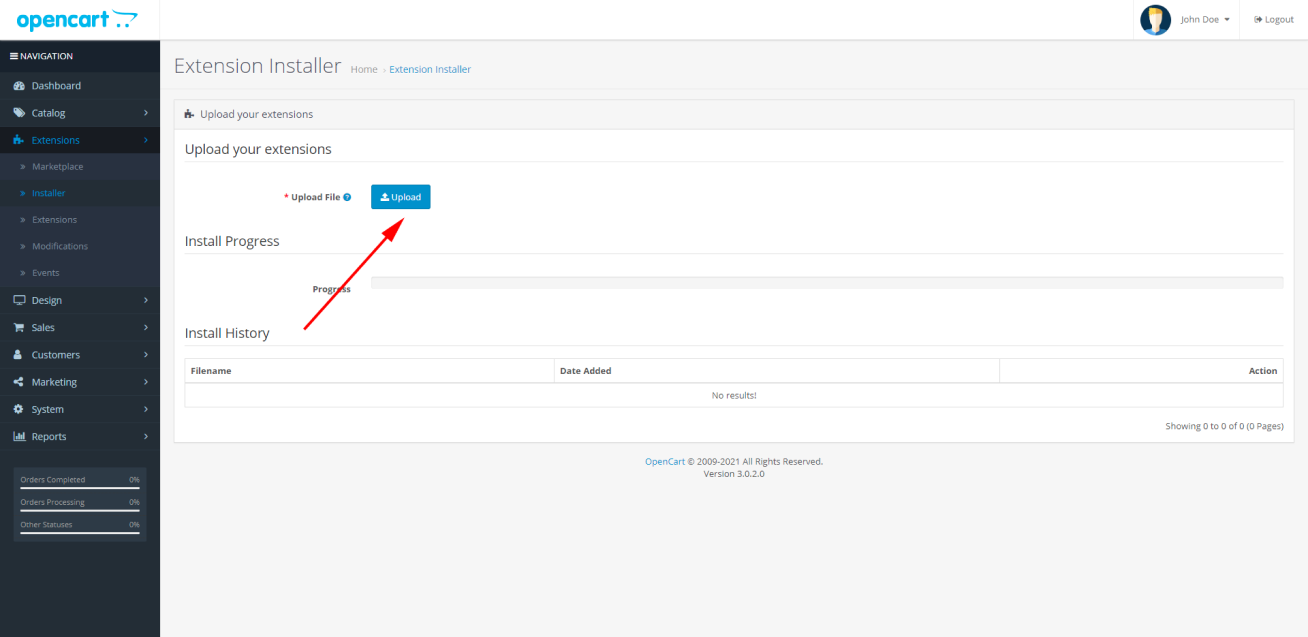
- 2. Next, click on the "Extension Installer" item:
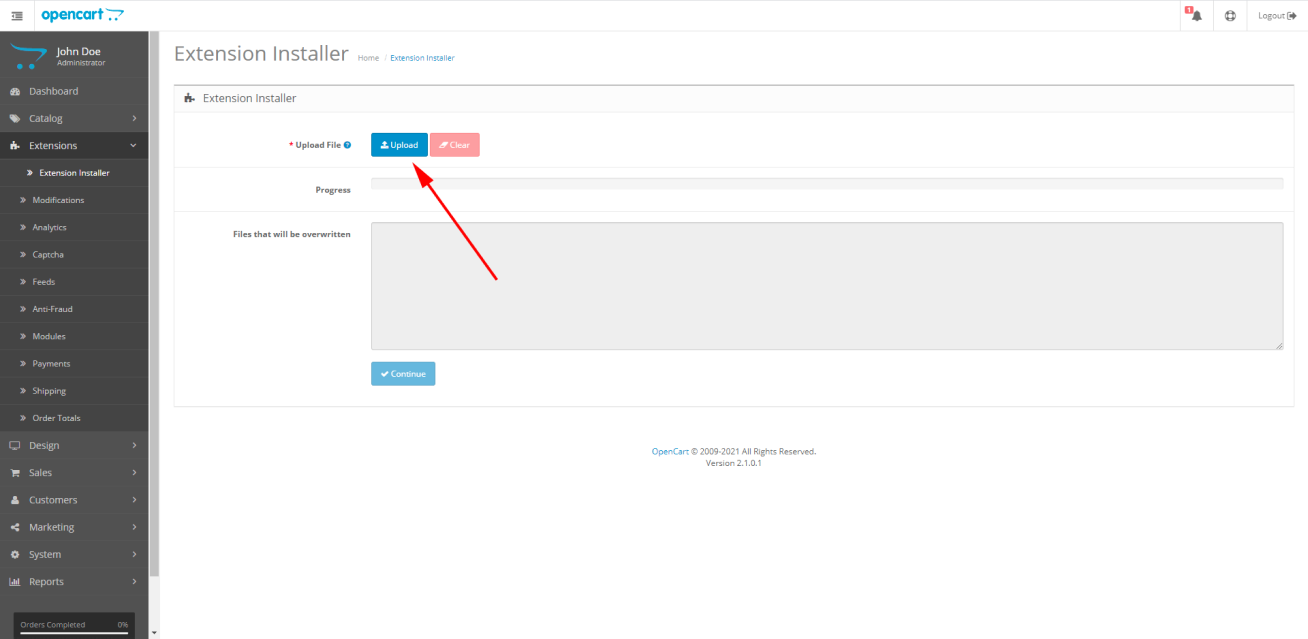
- 3. Select the upload in the "Extension Installer" (in the system window, select the previously downloaded archive with the extension):
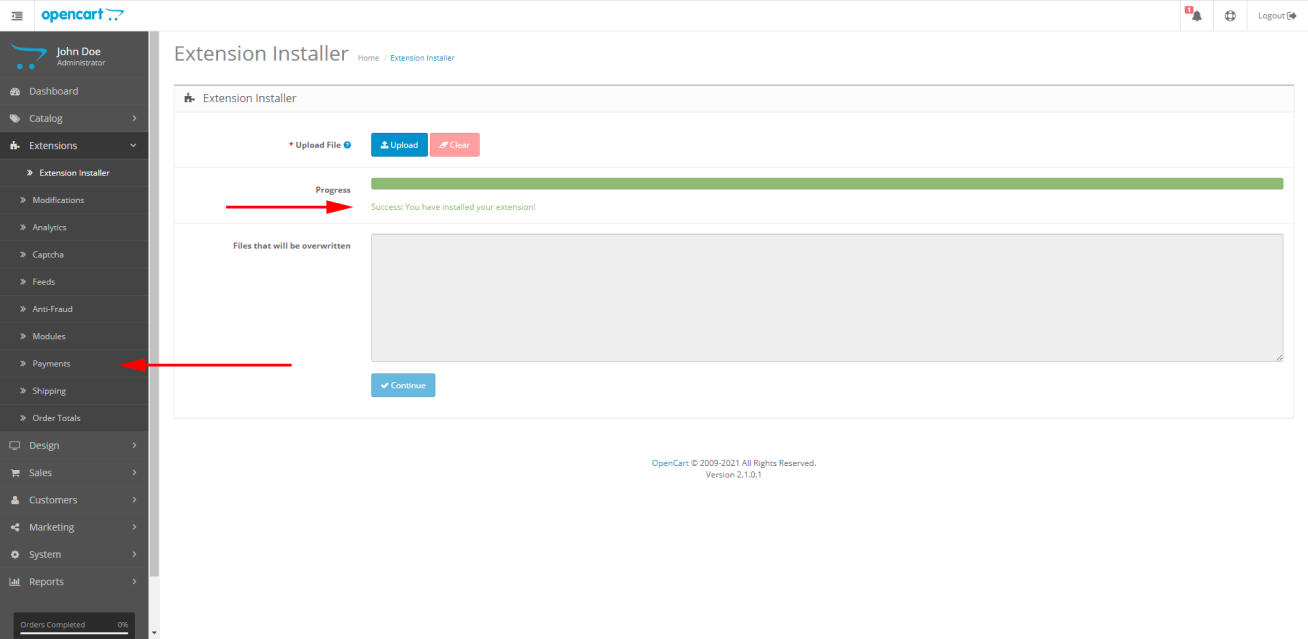
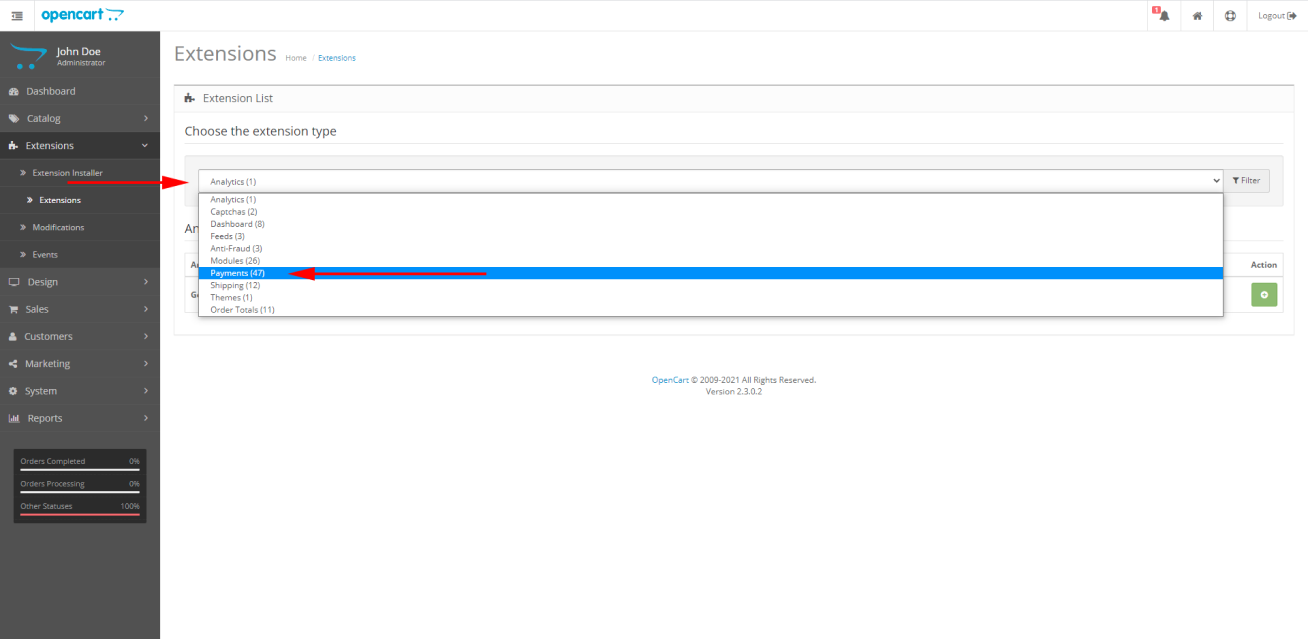
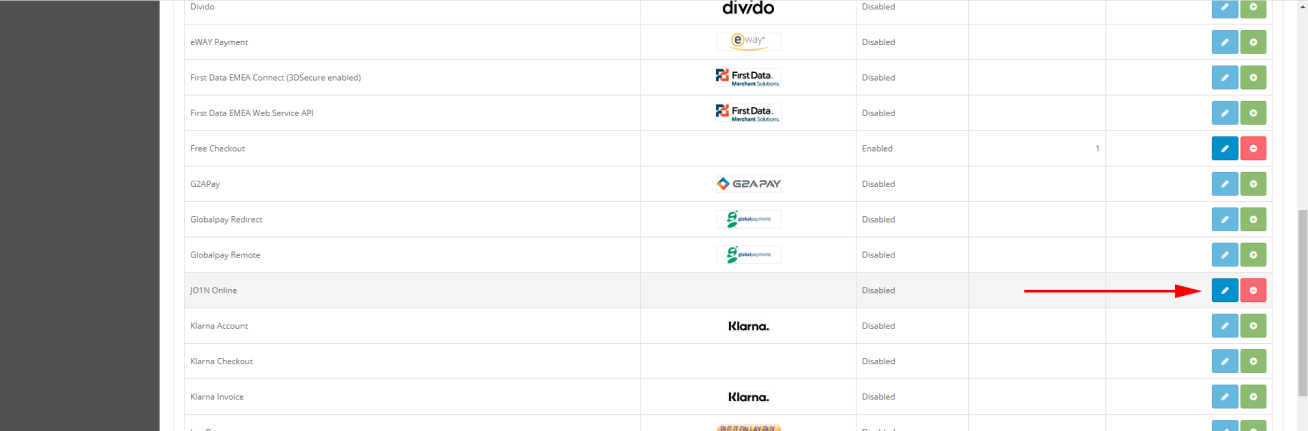
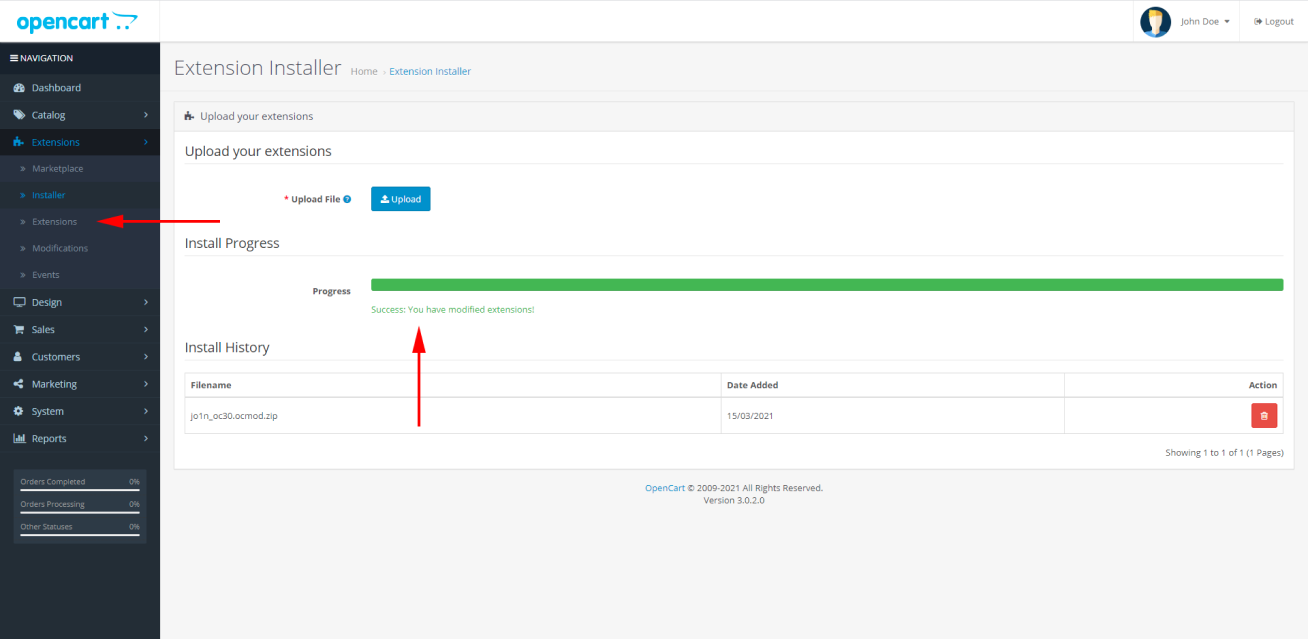
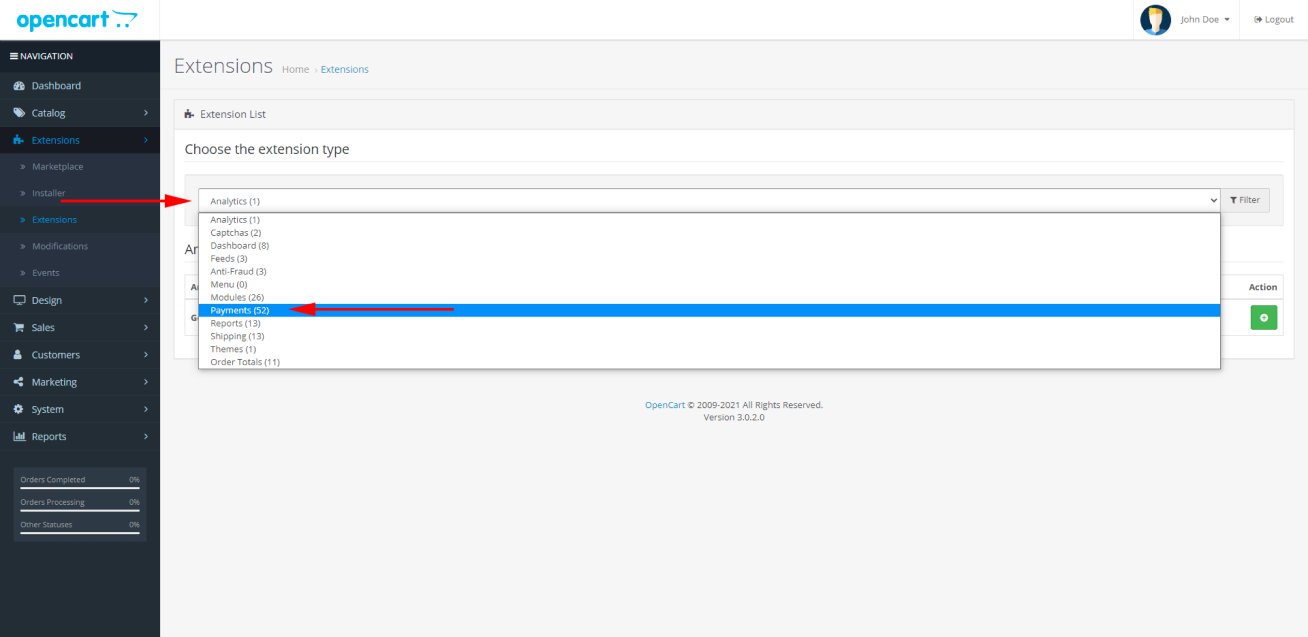
- 4. Wait for the successful download of the JO1N Online extension and click on the "Payments" item in the "Extensions" section:
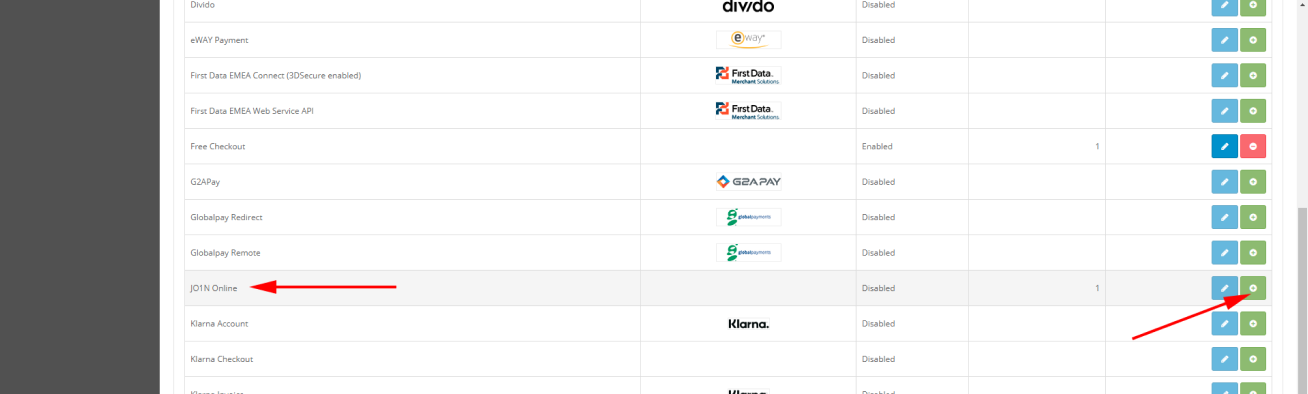
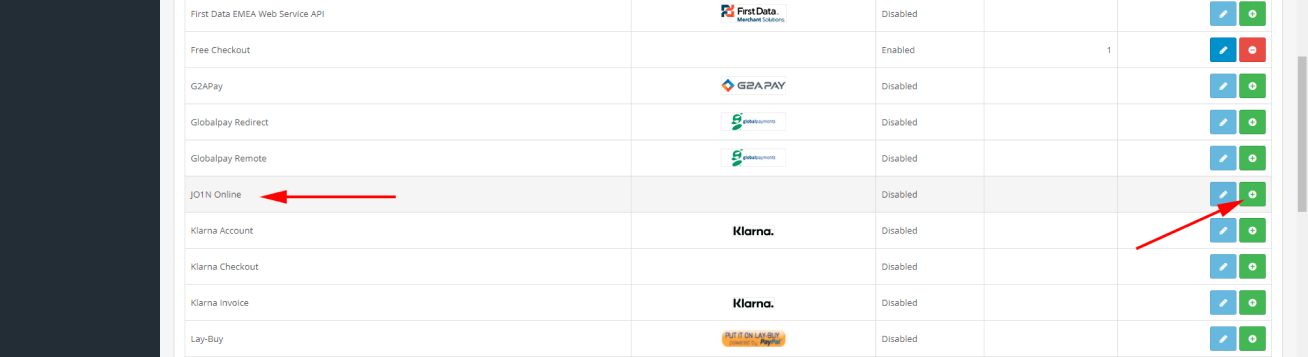
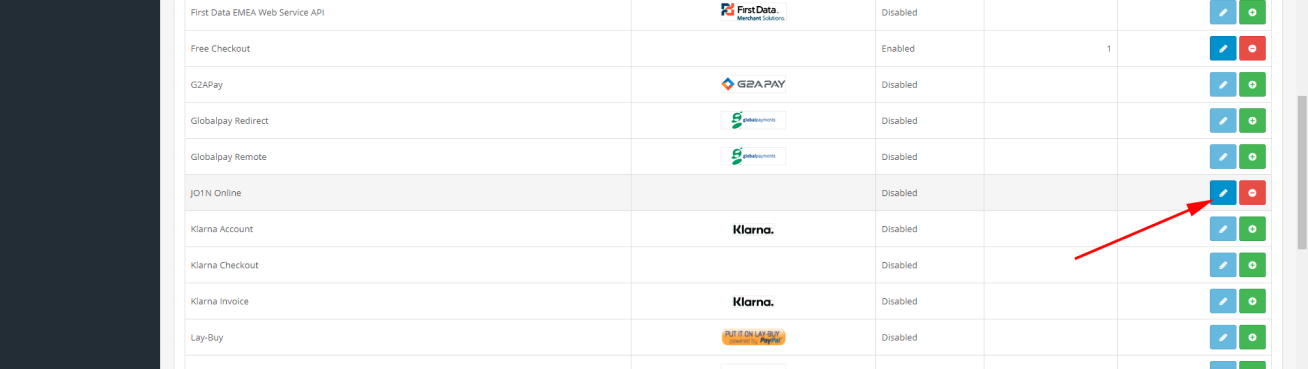
- 5. Find the uploaded JO1N Online module, then click on the add-on installation button (green button with a “+” sign):
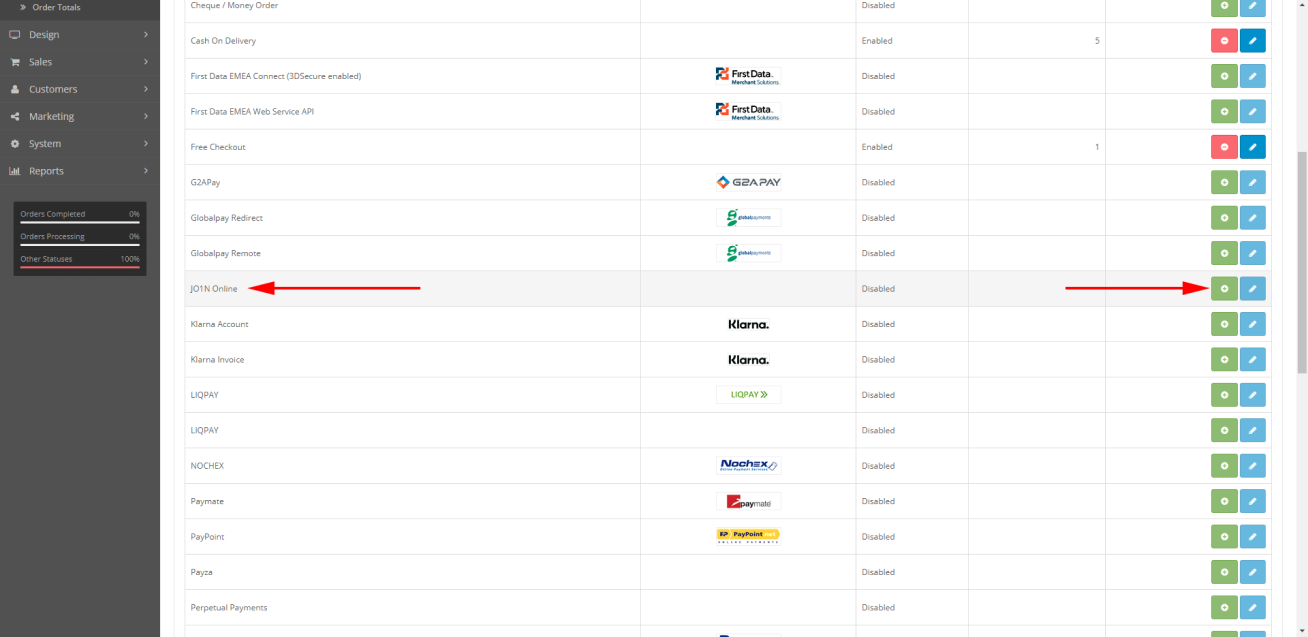
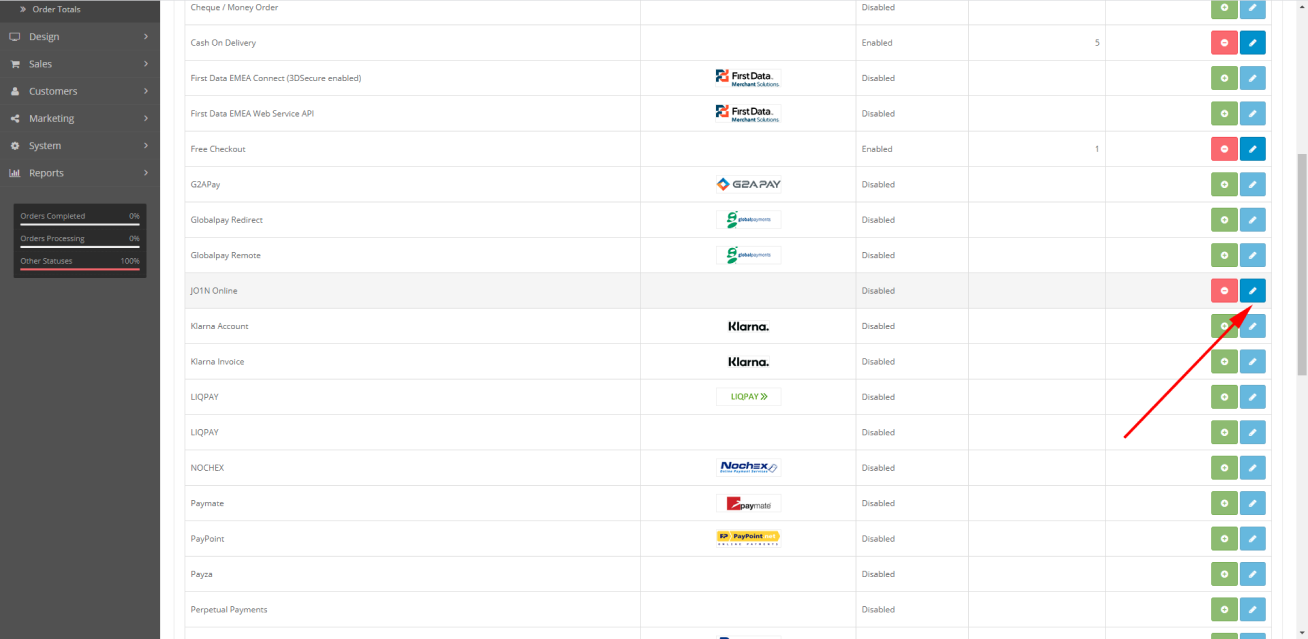
- 6. After installing the extension, click on the extension settings button (blue button with a pencil icon):
- JO1N x OpenCart 2.1 set-up guide:
- 1. On the settings page of the JO1N payment module fill in the settings previously agreed with your manager (1-6), then enable the module (7) and save the settings (8):
(1) Server address – lending service address, by default the test service address is set.
(2) Username (Login) – login of the demo store. After the testing and installation of the functional solution has to be changed for the login of your merchant store.
(3) Password – Test account password is 1234567, After the testing and installation of the functional solution has to be changed for the password of your merchant store.
(4) Sales outlet code – merchant retail store code, which will be passed to JO1N by default together with the order details.
(5) Default product group ID – product group code
(6) processCode - ???
(7) Status – enable / disable the checkout lending extension 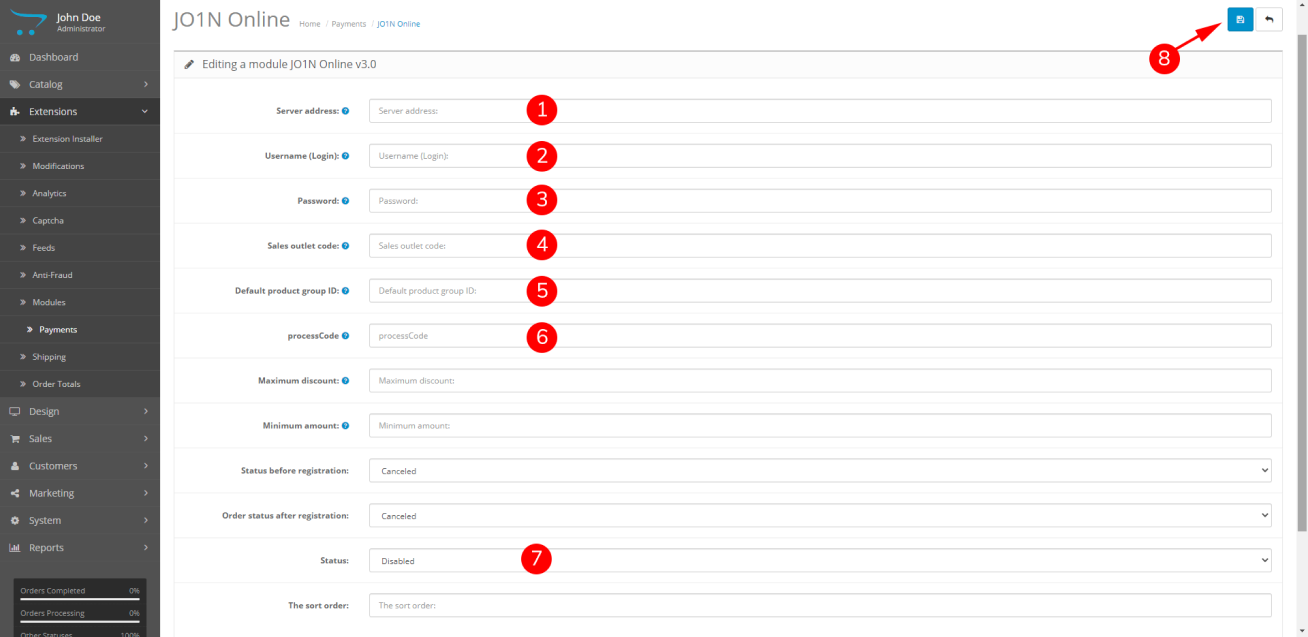
JO1N e-commerce lending module is used to connect online stores to the JO1N POS lending service. Used as the standard payment method for financing the goods (paying for an order).
- JO1N x OpenCart 2.3 installation guide:
- 1. Click on the "Extensions" section (displayed by the red arrow) In the control panel:
- 2. Next, click on the "Extension Installer" item:
- 3. Select the upload in the "Extension Installer" (in the system window, select the previously downloaded archive with the extension):

- 4. Wait for the successful download of the JO1N Online extension and click on the "Extensions" item in the "Extensions" section:
- 5. In the "Extensions" section, select the type of extension "Payments:
- 6. Find the uploaded JO1N Online module, then click on the add-on installation button (green button with a “+” sign:
- 7. After installing the extension, click on the extension settings button (blue button with a pencil icon):
- JO1N x OpenCart 2.3 set-up guide:
- 1. On the settings page of the JO1N payment module fill in the settings previously agreed with your manager (1-6), then enable the module (7) and save the settings (8)
(1) Server address – lending service address, by default the test service address is set.
(2) Username (Login) – login of the demo store. After the testing and installation of the functional solution has to be changed for the login of your merchant store.
(3) Password – Test account password is 1234567, After the testing and installation of the functional solution has to be changed for the password of your merchant store.
(4) Sales outlet code – merchant retail store code, which will be passed to JO1N by default together with the order details.
(5) Default product group ID – product group code
(6) processCode - ???
(7) Status – enable / disable the checkout lending extension 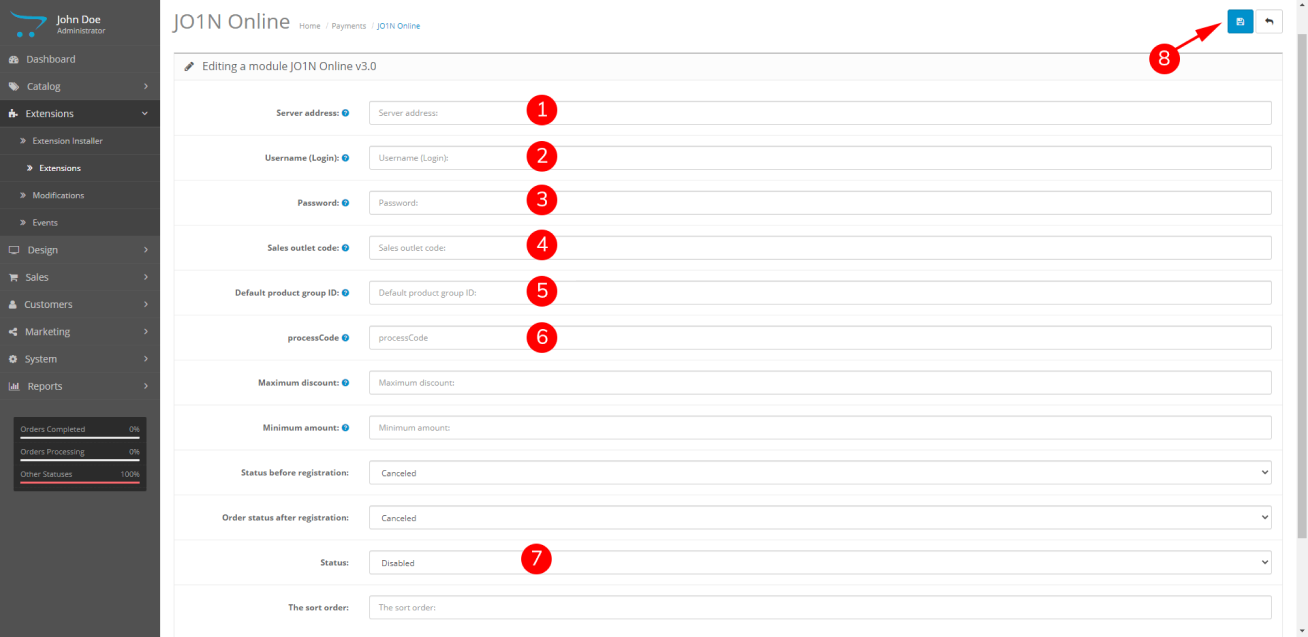
- JO1N e-commerce lending module is used to connect online stores to the JO1N POS lending service. Used as the standard payment method for financing the goods (paying for an order).
- JO1N x OpenCart 3.0 installation guide:
- 1. Click on the "Extensions" section (displayed by the red arrow) In the control panel:
- 2. Next, click on the "Extension Installer" item:
- 3. Select the upload in the "Extension Installer" (in the system window, select the previously downloaded archive with the extension):
- 4. Wait for the successful download of the JO1N Online extension and click on the "Extensions" item in the "Extensions" section:
- 5. In the "Extensions" section, select the type of extension "Payments":
- 6. Find the uploaded JO1N Online module, then click on the add-on installation button (green button with a “+” sign:
- 7. After installing the extension, click on the extension settings button (blue button with a pencil icon):
- JO1N x OpenCart 3.0 set-up guide:
- 1. On the settings page of the JO1N payment module fill in the settings previously agreed with your manager (1-6), then enable the module (7) and save the settings (8):
(1) Server address – lending service address, by default the test service address is set.
(2) Username (Login) – login of the demo store. After the testing and installation of the functional solution has to be changed for the login of your merchant store.
(3) Password – Test account password is 1234567, After the testing and installation of the functional solution has to be changed for the password of your merchant store.
(4) Sales outlet code – merchant retail store code, which will be passed to JO1N by default together with the order details
(5) Default product group ID – product group code
(6) processCode - ???
(7) Status – enable / disable the checkout lending extension 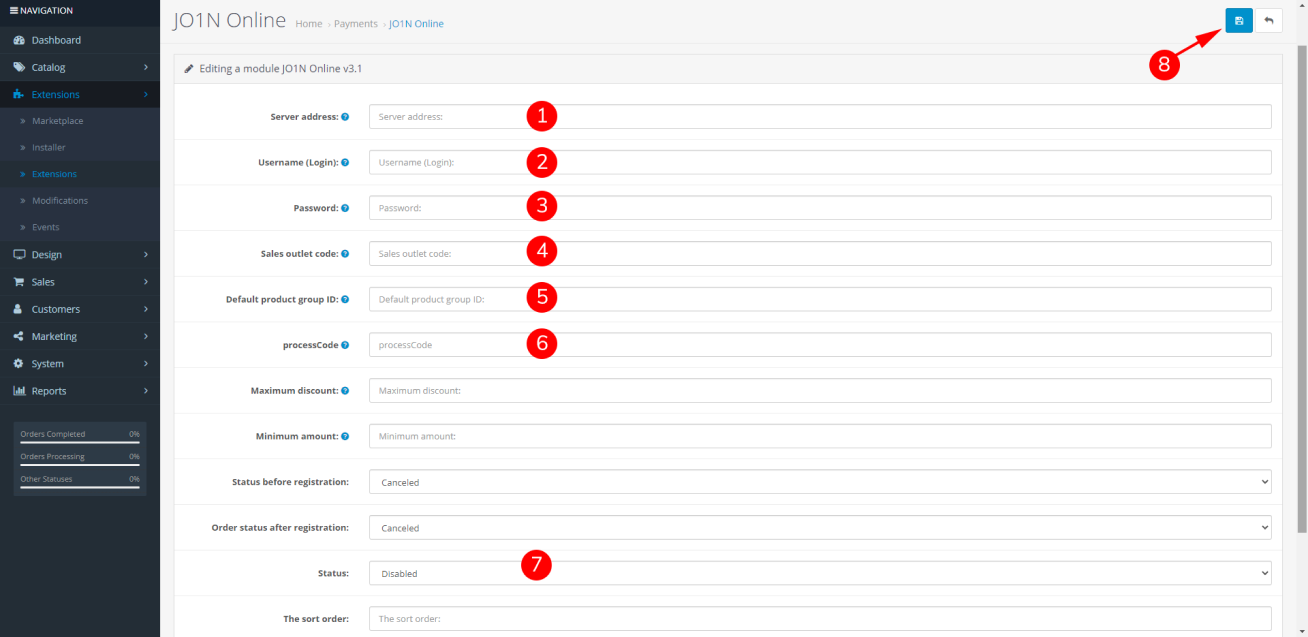
CS Cart
JO1N x CS.Cart installation guide:
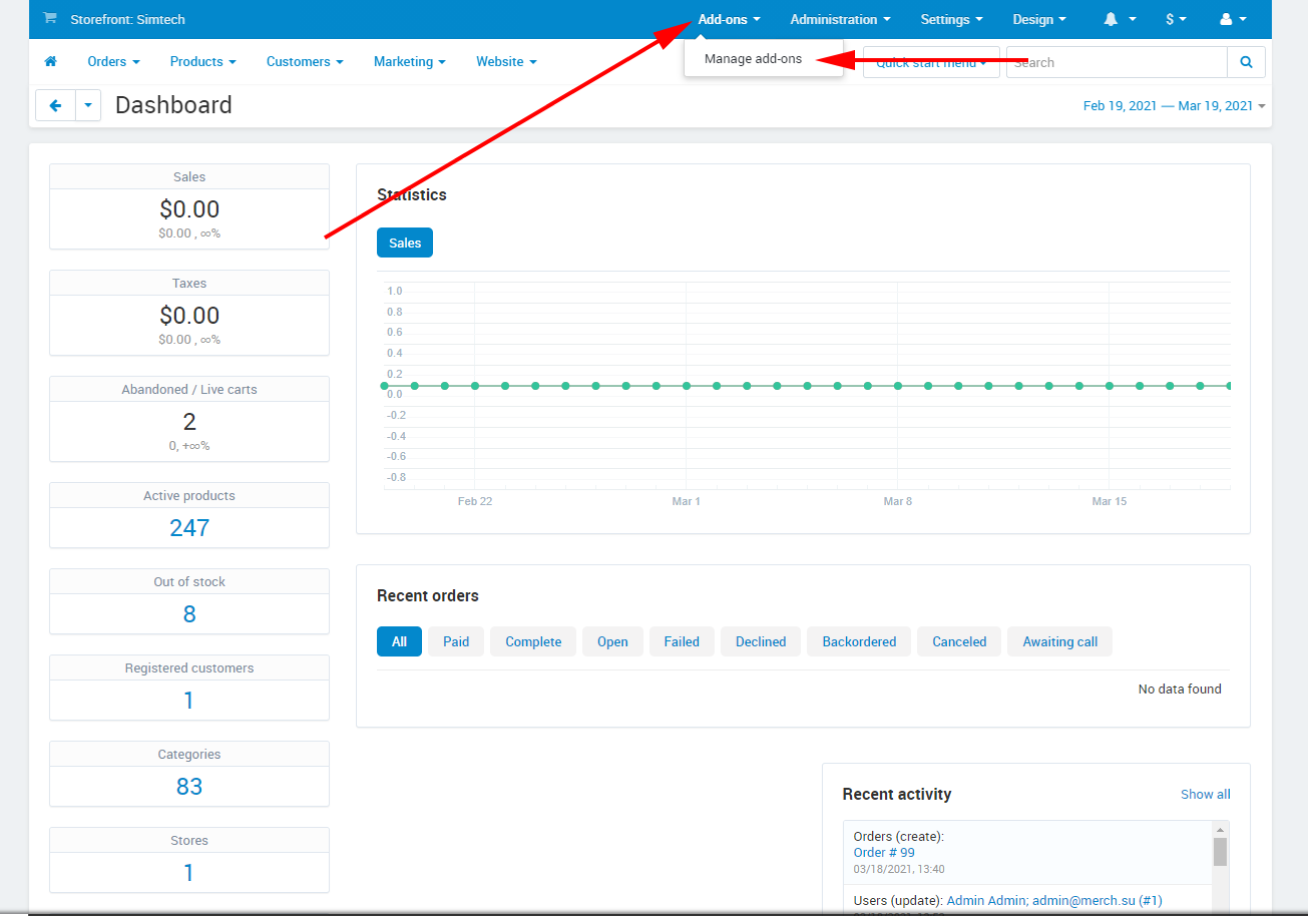
- 1. In the control panel, click on the “Add-ons” drop-down menu button (shown with a long red arrow) and select “Manage addons” (shown with a short red arrow):
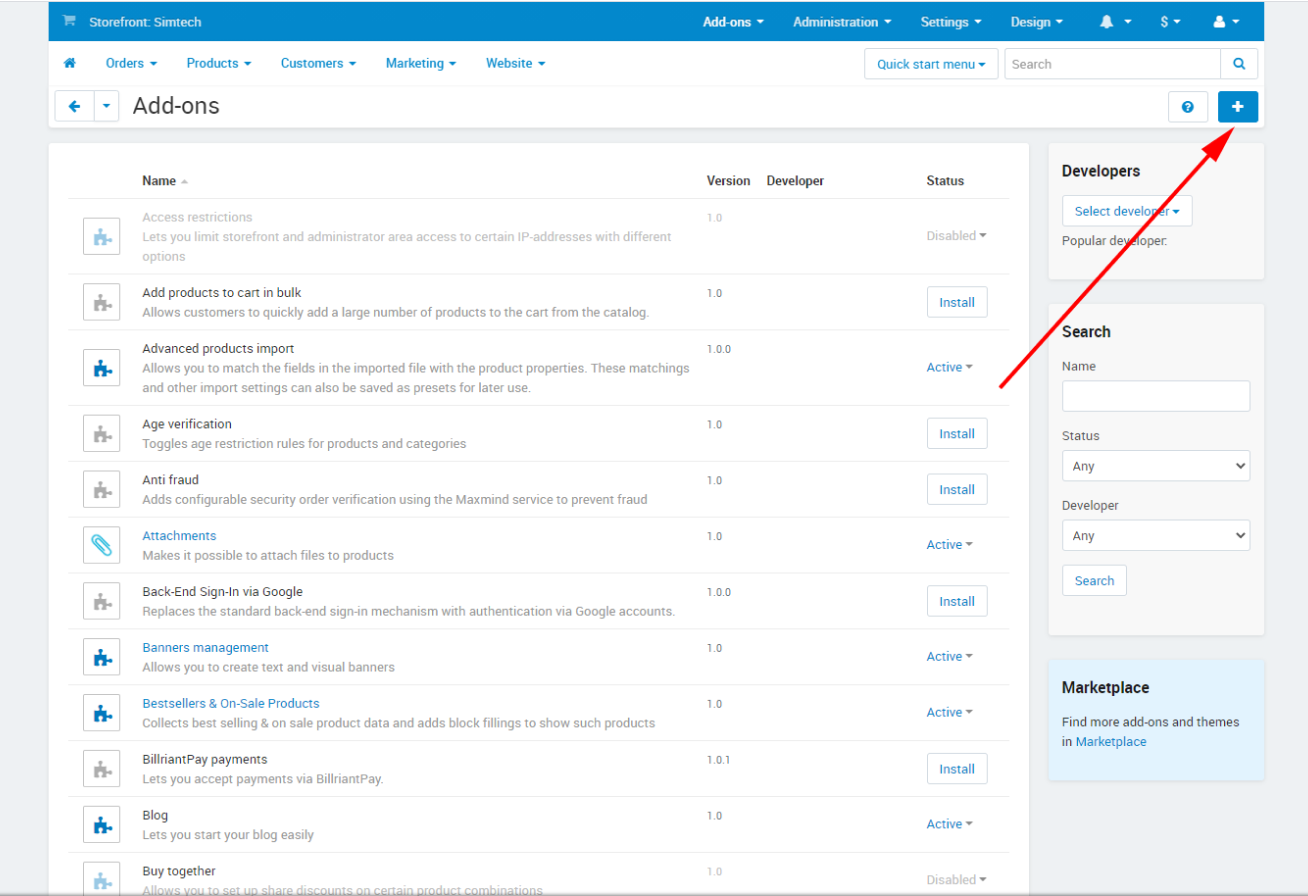
- 2. Click the “+” button to add the JO1N module in the “Add-ons” page (indicated by the red arrow):
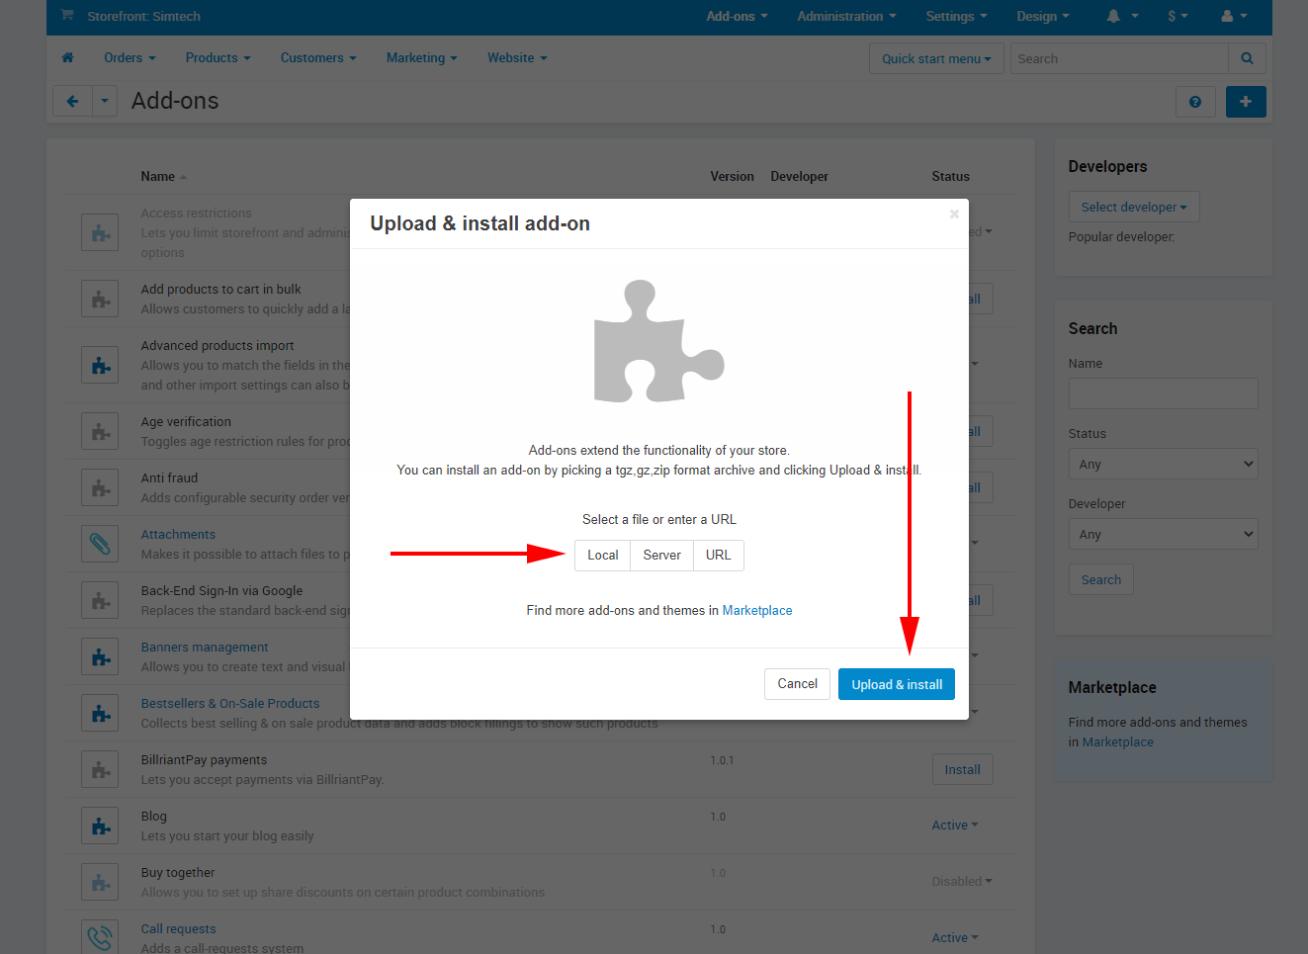
- 3. Click the “Local” button in the newly opened window. Then choose the achieve with the module. Click the “Upload & install” button:
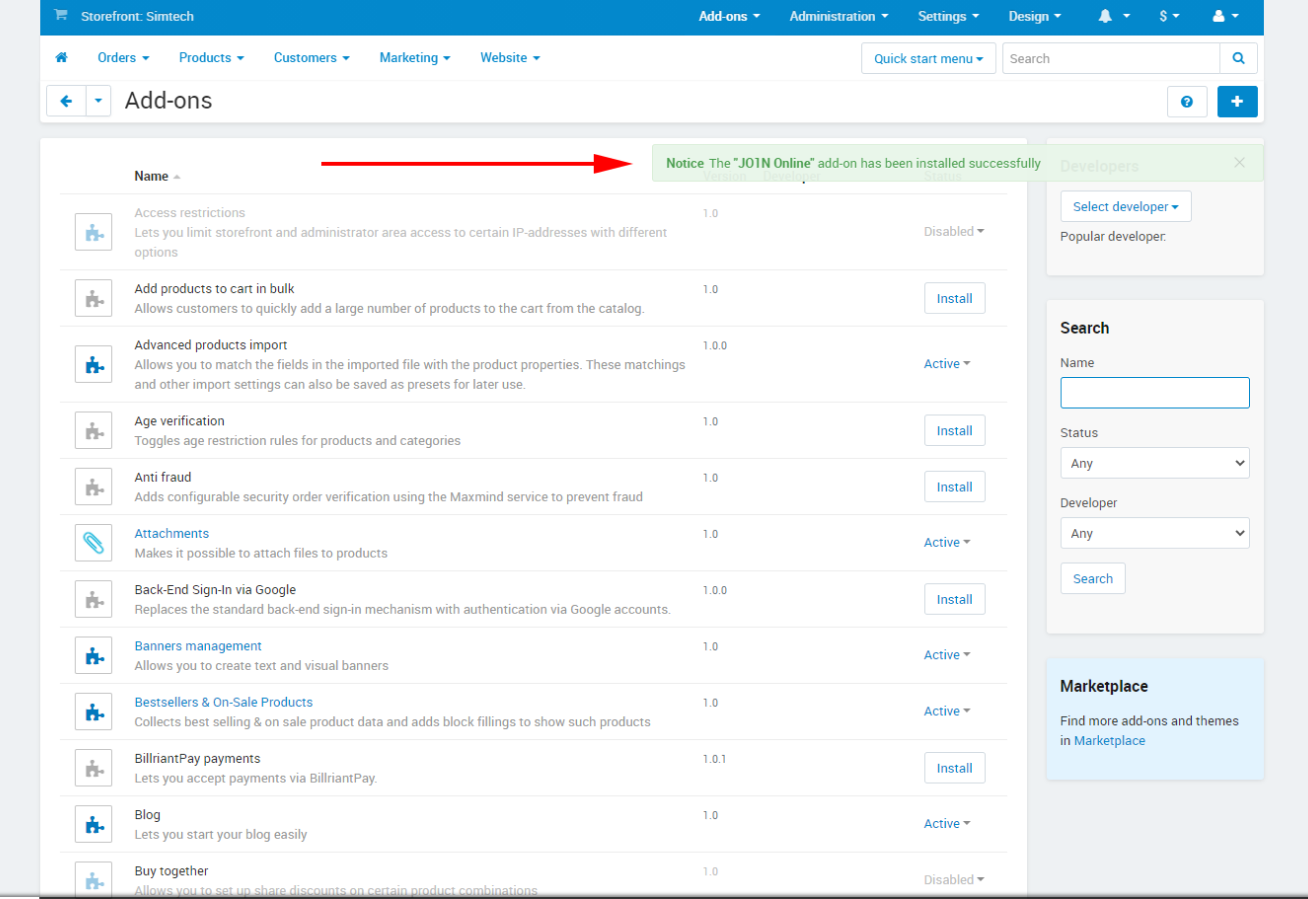
- 4. The following message will appear after the successful module installation (green text on the image below):
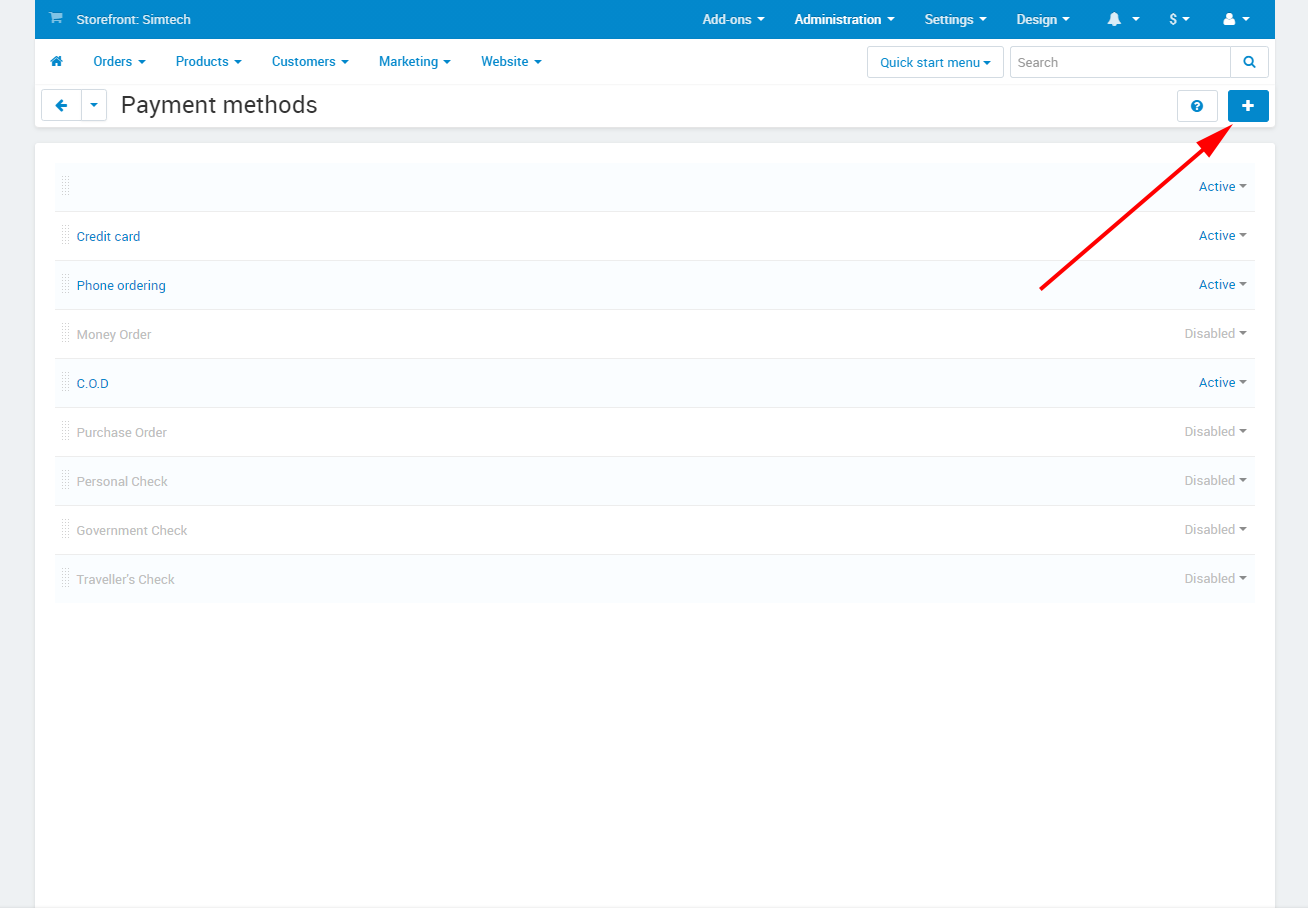
- 5. Once the module is installed, click the “Administrator” button in the header, navigate and click the “Payment methods” option:

- 6. Click the “+” button on the “Payment methods” page:
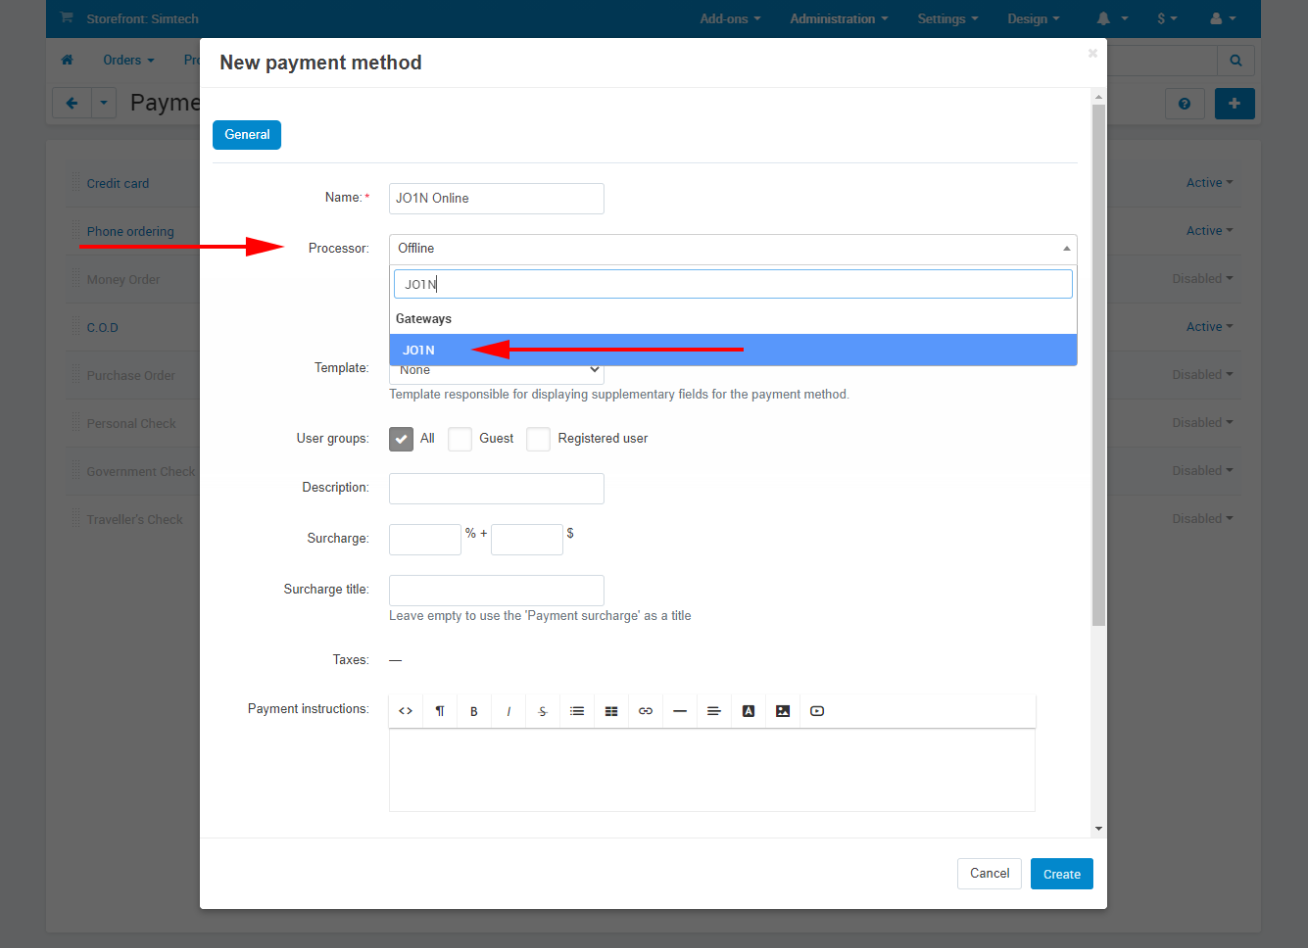
- 7. In the “Name field” of the newly opened window, enter the displayed name on the checkout page in the “Processor” field. Then select the installed “JO1N” module:

- 8. After choosing the “Processor”, “Config” button will appear. Click “Configs” and fill-in previously agreed data. Click the “Create” button once done:
(1) Api Url – lending service address; the test service address is set by default
(2) Point ID – merchant retail store code, which will be passed to JO1N by default together with the order details
(3) Login – login of the demo store. After the testing and installation of the functional solution has to be changed for the login of your merchant store.
(4) Password – Test account password is 1234567, After the testing and installation of the functional solution has to be changed for the password of your merchant store.
(5) Group ID – item group code
(6) processCode - ??? 
JO1N x CS.Cart set-up guide:
- 1. Once the module is installed, click the “Administrator” button in the header, navigate and click the “Payment methods” option:

- 2. Click the “+” button on the “Payment methods” page:

- 3. In the “Name field” of the newly opened window, enter the displayed name on the checkout page in the “Processor” field. Then select the installed “JO1N” module:
- 4. After choosing the “Processor”, “Config” button will appear. Click “Configs” and fill-in previously agreed data. Click the “Create” button once done:
(1) Api Url – lending service address; the test service address is set by default
(2) Point ID – merchant retail store code, which will be passed to JO1N by default together with the order details
(3) Login – login of the demo store. After the testing and installation of the functional solution has to be changed for the login of your merchant store.
(4) Password – Test account password is 1234567, After the testing and installation of the functional solution has to be changed for the password of your merchant store.
(5) Group ID – item group code
(6) processCode - ??? 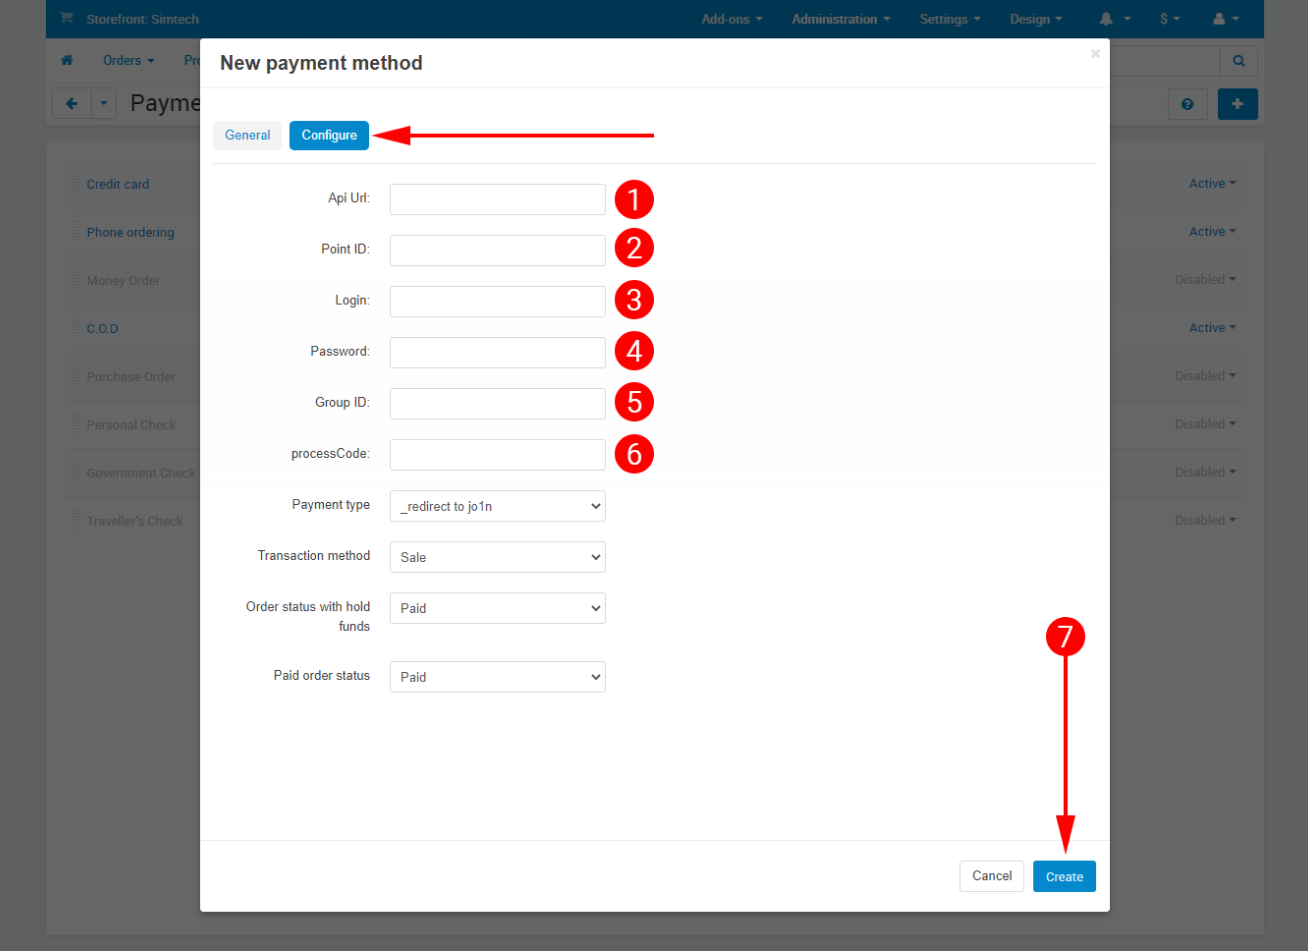
ZenCart
The JO1N_Gateway lending module is used to connect online stores to the JO1N POS lending solution. Used as the standard payment method for financing the goods on your website.
- JO1N installation guide for ZenCart:
- 1. Open any FTP client and navigate to your domain folder. Upload the archive file of the payment module, then unzip it.
- 2. After successful loading of the JO1N Online module, navigate to the ZenCart “Control panel”. Select the “Modules” menu item in the header and click on the “Payments” item.
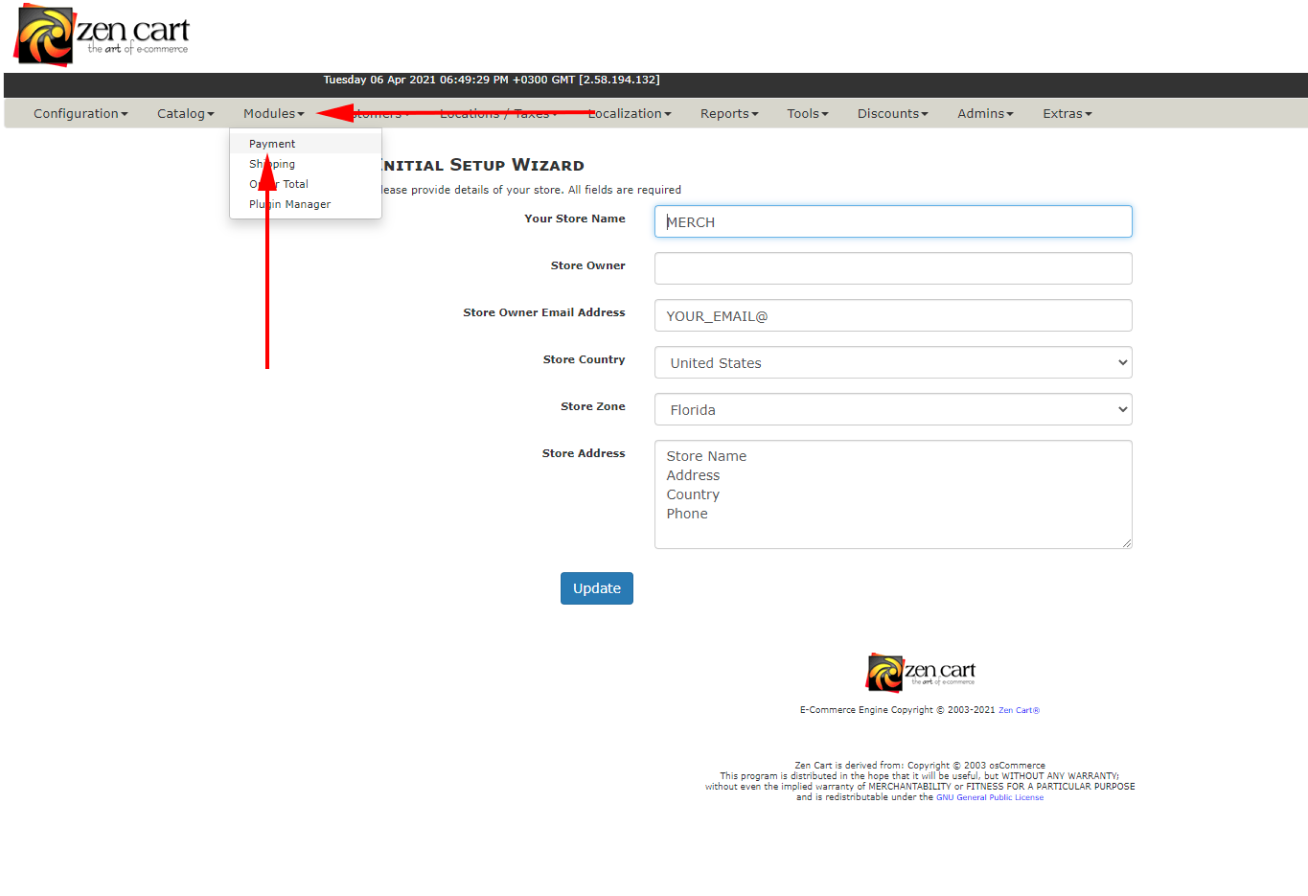
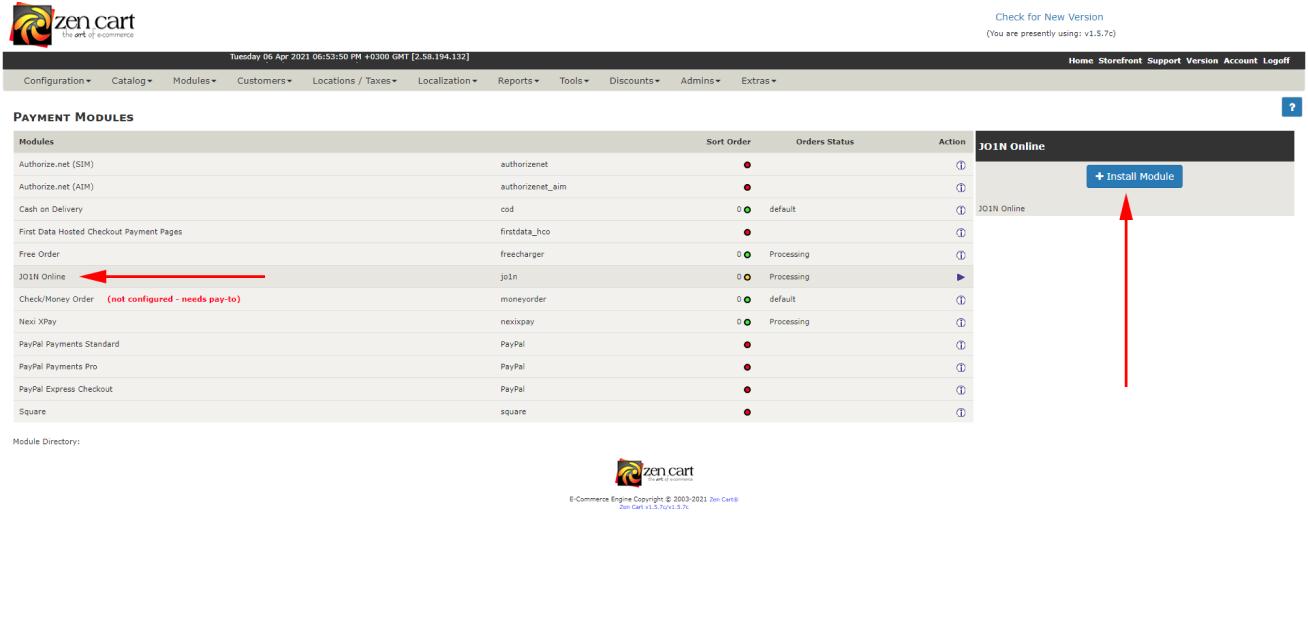
- 3. Proceed to the "Modules - Payment" section, find and select the “JO1N” module and then click the “Install Module” button
- 4. Enable the module after the installation and fill in the required module setting, pre-agreed with yout manager.
(1) Api Url – lending service address; the test service address is set by default
(2) Login – login to connect to the lending service
(3) Password – the passwords for accessing the lending solution
(4) Group ID – item group code pre-agreed with the e-store manger
(5) Point ID – merchant retail store code
(6) processCode – ???
Click the “Update” button once all the details are entered (7) 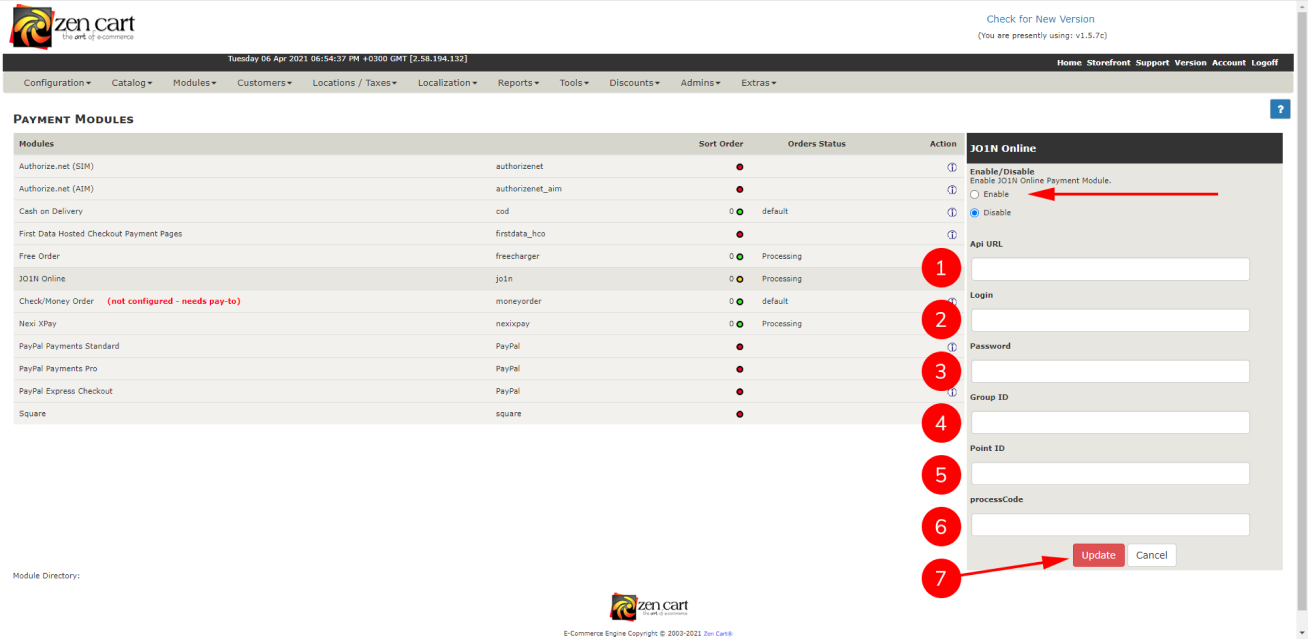
- The JO1N_Gateway lending module is used to connect online stores to the JO1N POS lending solution. Used as the standard payment method for financing the goods on your website.
- JO1N set-up guide for ZenCart:
- 1. Enable the module after the installation and fill in the required module setting, pre-agreed with yout manager.
(1) Api Url – lending service address; the test service address is set by default
(2) Login – login to connect to the lending service
(3) Password – the passwords for accessing the lending solution
(4) Group ID – item group code pre-agreed with the e-store manger
(5) Point ID – merchant retail store code
(6) processCode – ???
Click the “Update” button once all the details are entered (7) 
osCommerce
- The JO1N Online lending module is used to connect online stores to the JO1N POS lending solution. Used as the standard payment method for financing the goods on your website.
- JO1N installation guide for osCommerce:
- 1. Open any FTP client and navigate to your domain folder. Upload the archive file of the payment module, then unzip it.
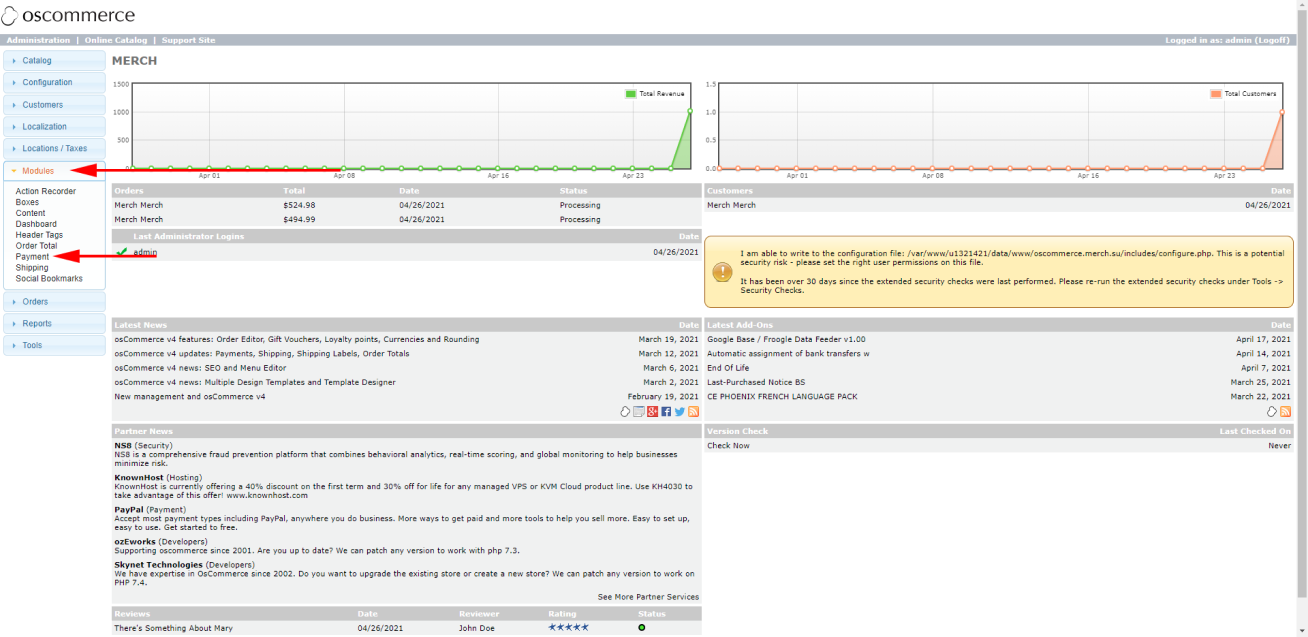
- 2. After successful uploading of the JO1N Online module, navigate to the OsCommerce. Select the “Modules” menu item in the header and click on the “Payments” item.
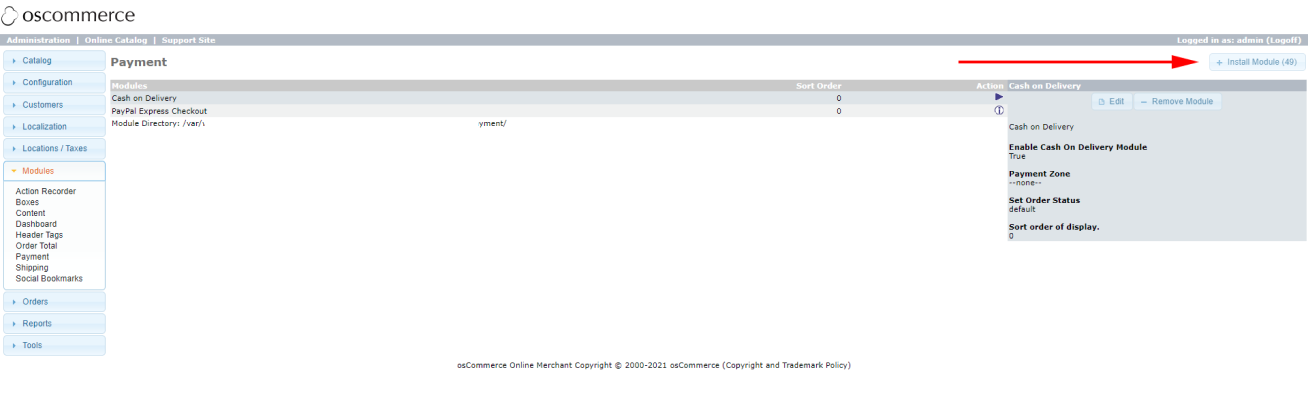
- 3. Proceed to the "Modules - Payment" section, find and select the “JO1N” module and then click the “Install Module” button.
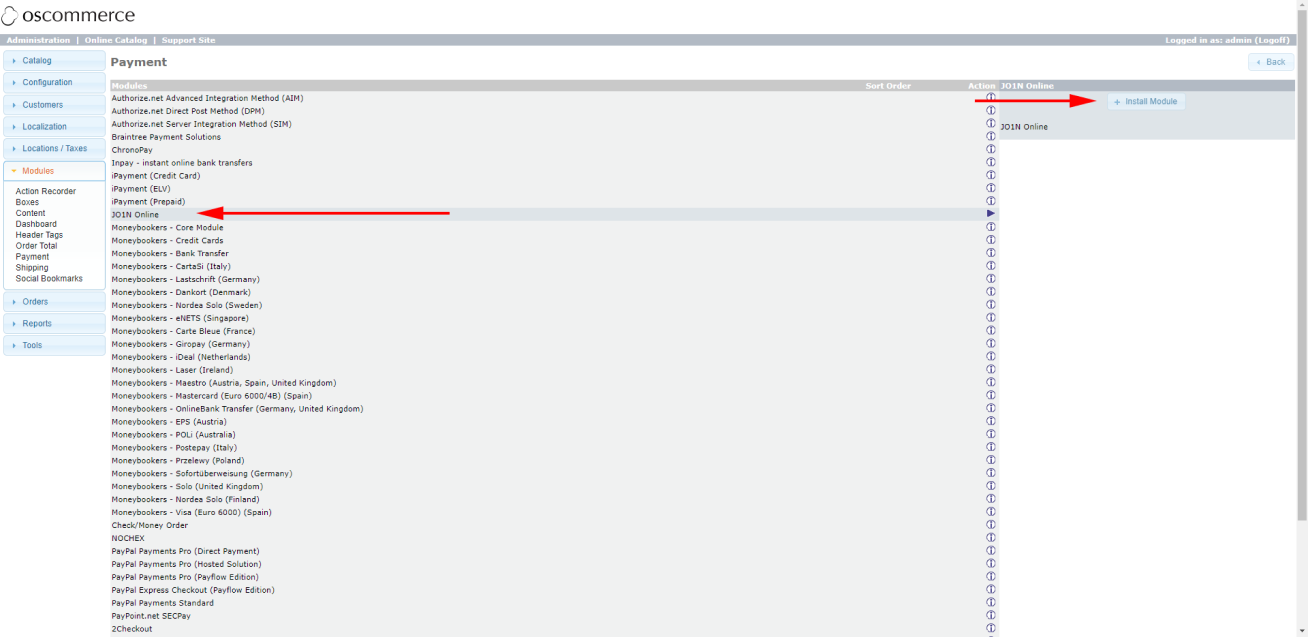
- 4. After proceeding to the module installation page, find the “JO1N Online” module, click on it “Install Module” button.
- 5. After successful installation of the module, you will be redirected to the “Modules - Payment” page, on this page find the previously installed JO1N Online module, click on it, and then click on the Edit button.
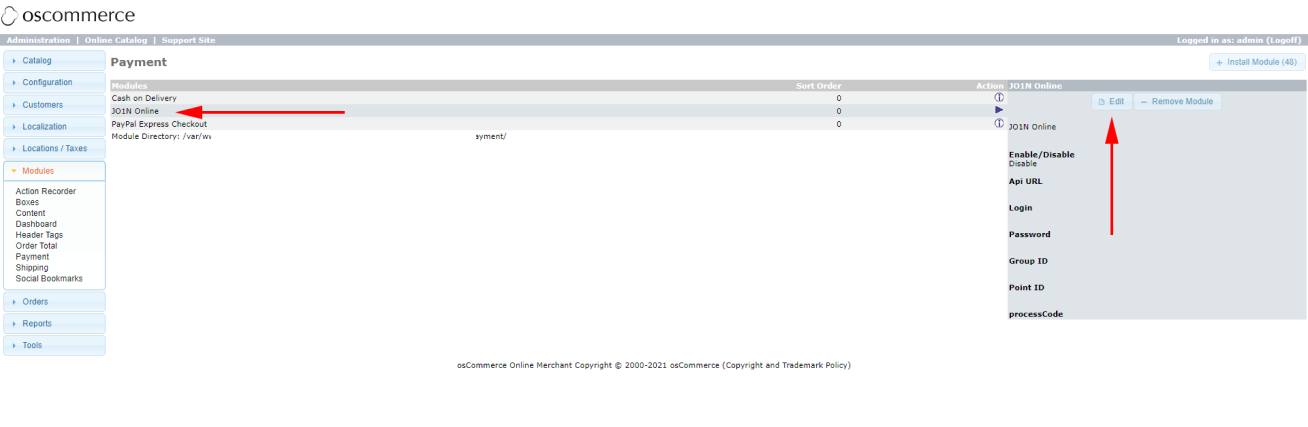
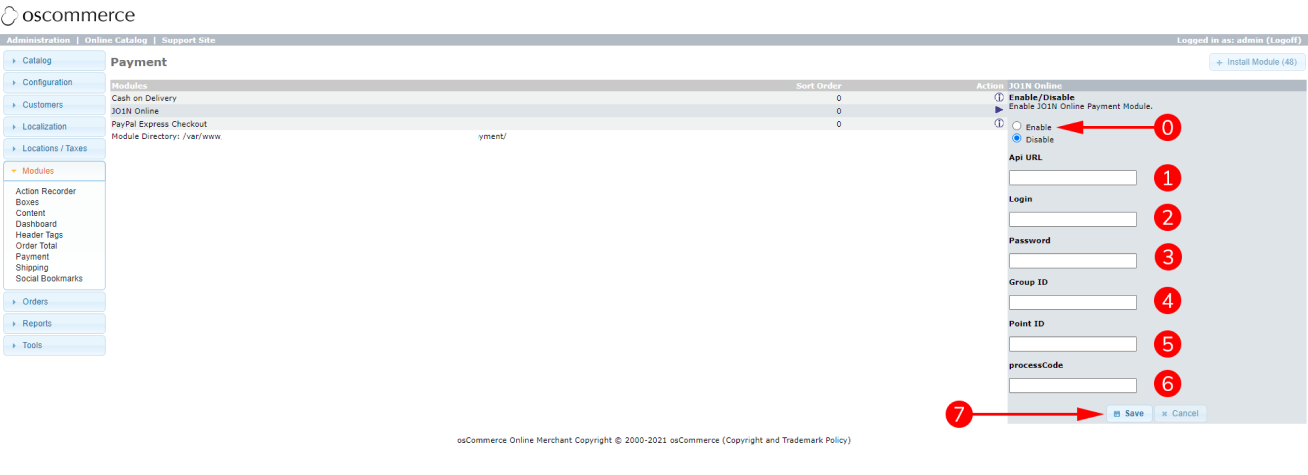
- 6. Enable the module after the installation and fill in the required module setting, pre-agreed with yout manager.
(1) Api Url – lending service address; the test service address is set by default
(2) Login – login to connect to the lending service
(3) Password – the passwords for accessing the lending solution
(4) Group ID – item group code pre-agreed with the e-store manger
(5) Point ID – merchant retail store code
(6) processCode – ??? Click the “Update” button once all the details are entered (7) 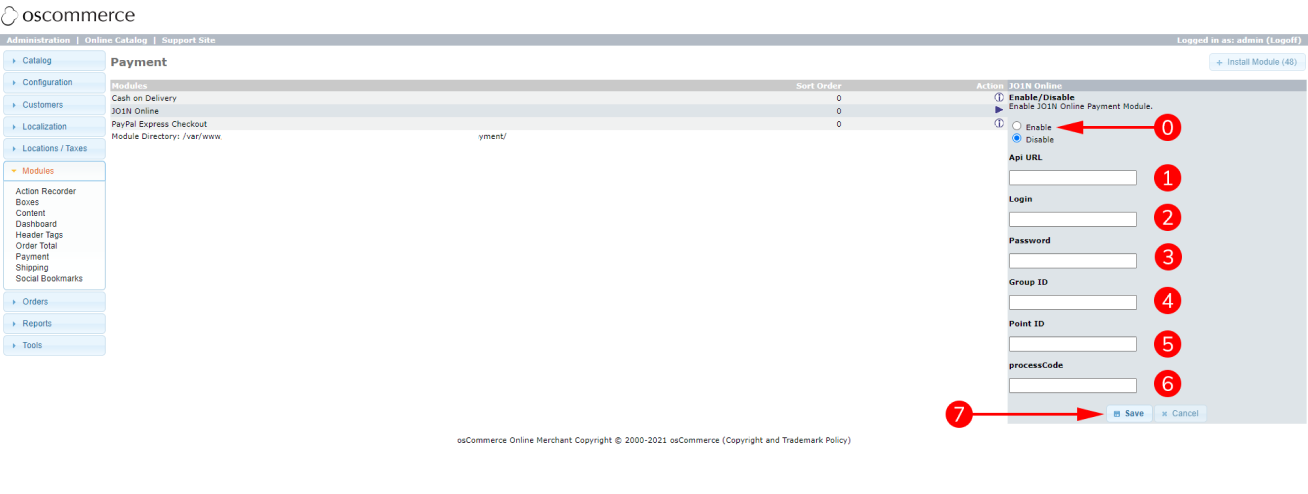
JO1N set-up guide for osCommerce:
- 1. Enable the module after the installation and fill in the required module setting, pre-agreed with yout manager.
(1) Api Url – lending service address; the test service address is set by default
(2) Login – login to connect to the lending service
(3) Password – the passwords for accessing the lending solution
(4) Group ID – item group code pre-agreed with the e-store manger
(5) Point ID – merchant retail store code
(6) processCode – ???
Click the “Update” button once all the details are entered (7)